Hopefully soon, I’ll have a diagram and perhaps YouTube video on how one can use not only separate audio devices for Record and Playback, but how to eliminate Feedback loops when using the External FX chain, or Playback/Recording onto another Montage Track, meanwhile using both interfaces for playback during all this. It’s complicated, but happens to work.
Here’s my solution for Mac OS:
Purchases:
Product #1: Loopback from Rogue Amoeba
- Is a software virtual audio interface (“Loopback Audio n”).
- Can route to any physical interface or even other applications.
- Set and Forget; it starts up automatically when the machine is rebooted.
Product #2: Audio Hijack from Rogue Amoeba
-
Can commandeer or take over any application’s audio output, or tap into the output of any physical device as seen by the OS. Just beware that hi-jacked audio from an application cuts off the original stream (hijacking it completely), rather than tapping into it.
-
Can adjust the audio stream with plug-ins, such as a room EQ or Room correction plug-in.
Both of these products are quite flexible, but together (often discounted as a bundle) they can do most anything with audio streams.
NOTE: In this post, I’m using two physical audio interfaces:
- Benchmark DAC3 B (D/A converter) to the playback/monitor speaker system
- MOTU 8D - Digital router used to convert AES/EBU to and from a CraneSong D/A-A/D converter to USB streams for Mac OS. This is used for the analog mastering chain.
Requirements:
-
I want to always use the Benchmark D/A for room playback, regardless of what else is going on. This allows me to use room correction.
-
I want to use a TC Electronic Clarity M meter (S/PDIF input) without being subjected to room correction. It is plugged into an output from the MOTU 8D.
-
I want to route a completely separate audio stream through an analog mastering chain without being subjected to room correction or any audio feedback loops.
NOTE: Mac OS allows one to create a virtual interface to isolate audio interfaces from an application, but I personally found it to be limited and not without audio glitches.
Procedure:
On the MOTU 8D Router
-
Set up the MOTU 8D to have four (4) inputs and outputs (you can substitute this section with your own audio interface or outboard audio router)
NOTE The MOTU 8D is merely an audio router which can be any interface you’d like to use. Alter this procedure as you need. You may contact Amoeba support if you’d like some advice for how to connect your audio device.
In Loopback Audio
- Create a single *virtual *interface. Don’t worry about how it’s labeled, because it may UN-intuitively change from Pass-Thru to something else.
- Under the Sources column, click the (+) and select Pass-Thru, which creates a phantom interface source.
- In the Output Channels column, click the (+). This should create Channels 1 & 2.
- In the Monitors column, click the (+), and select the MOTU 8D (or your physical interface you would use here for a Send to the analog mastering chain)
- Under the Sources column, click the (+) and select the audio router (MOTU 8D) in my case.
- In the Output Channels column, click the (+). This should create Channels 3 & 4. Repeat this step to create Channels 5 & 6.
NOTE You can re-route wiring by hi-lighting the wire, and click Delete. Then re-route as you’d intuitively expect.
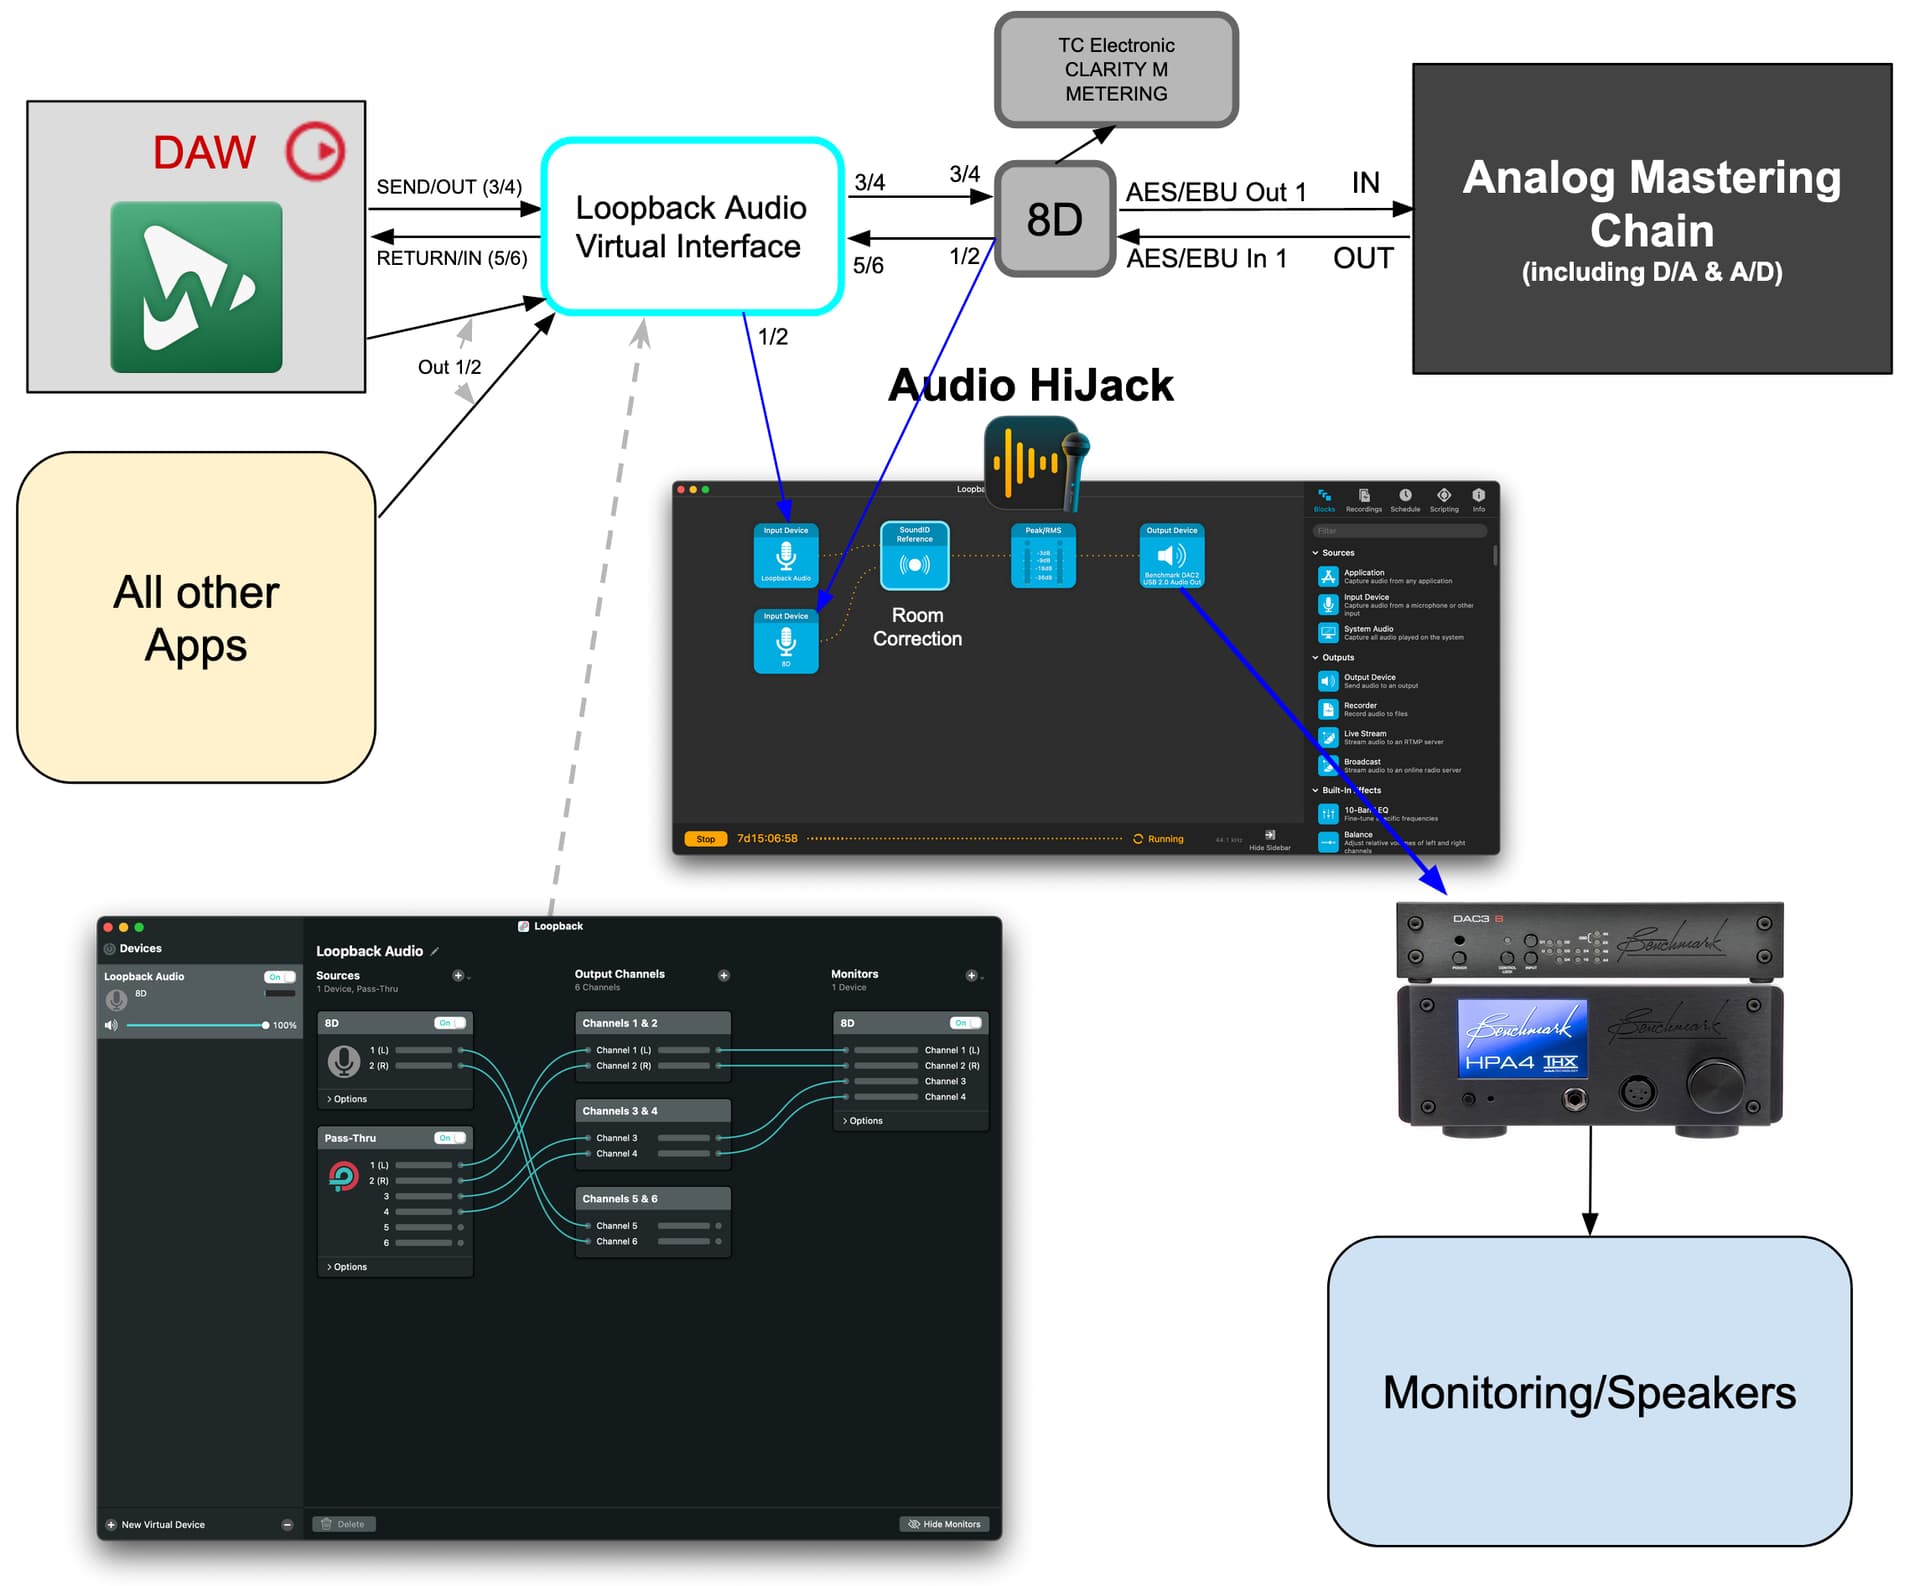
Below is my Loopback Audio setup:

- WL outputs to the Loopback Audio Pass-Thru interface source, channels 1 & 2, as shown in the Output Channels column. That alone is an output that can be directly connected or selected as an input elsewhere, as I’ll show you later.
- A Monitor is merely a copy of the signal routed to it for listening, monitoring, metering, etc., but I use it here for a Send to the analog mastering chain, and incidentally, my TC Electronic M meter.
- The MOTU 8D appears again in the Sources column as a Return from the analog chain. It routes to another Output channel (5 & 6), which WL will use as in input source from the Loopback Audio virtual interface.
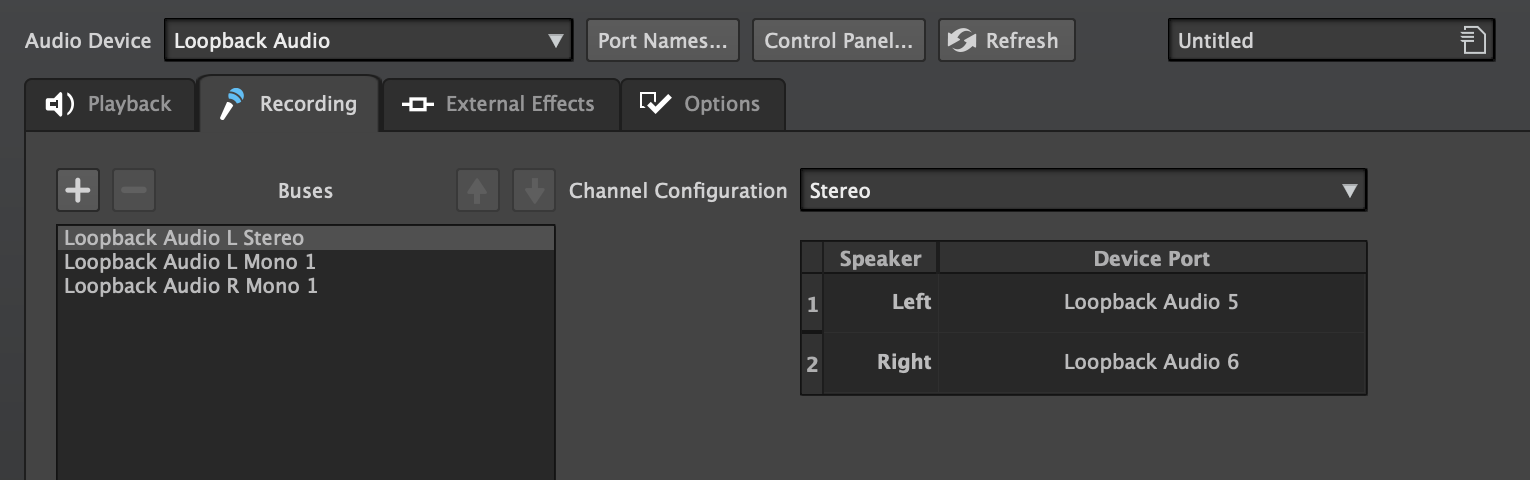
In Wavelab
-
Set the audio device to Loopback Audio.
-
Under the Playback tab, in the Main Playback Bus, select channels 1 and 2 for Left and Right. Set the Bus Category to Speaker Arrangement #1 (Don’t worry, this will make sense later).
-
Create another bus for a Send, so that you can playback audio from a Montage track, and record it onto another Montage track. Set the output of this bus to be channels 3 and 4. This eliminates a nasty feedback loop from WL’s Main output bus. Set the Bus Category to Speaker Arrangement #2.
-
For the Record tab, to select channels 5 & 6 from the Loopback Audio interface.
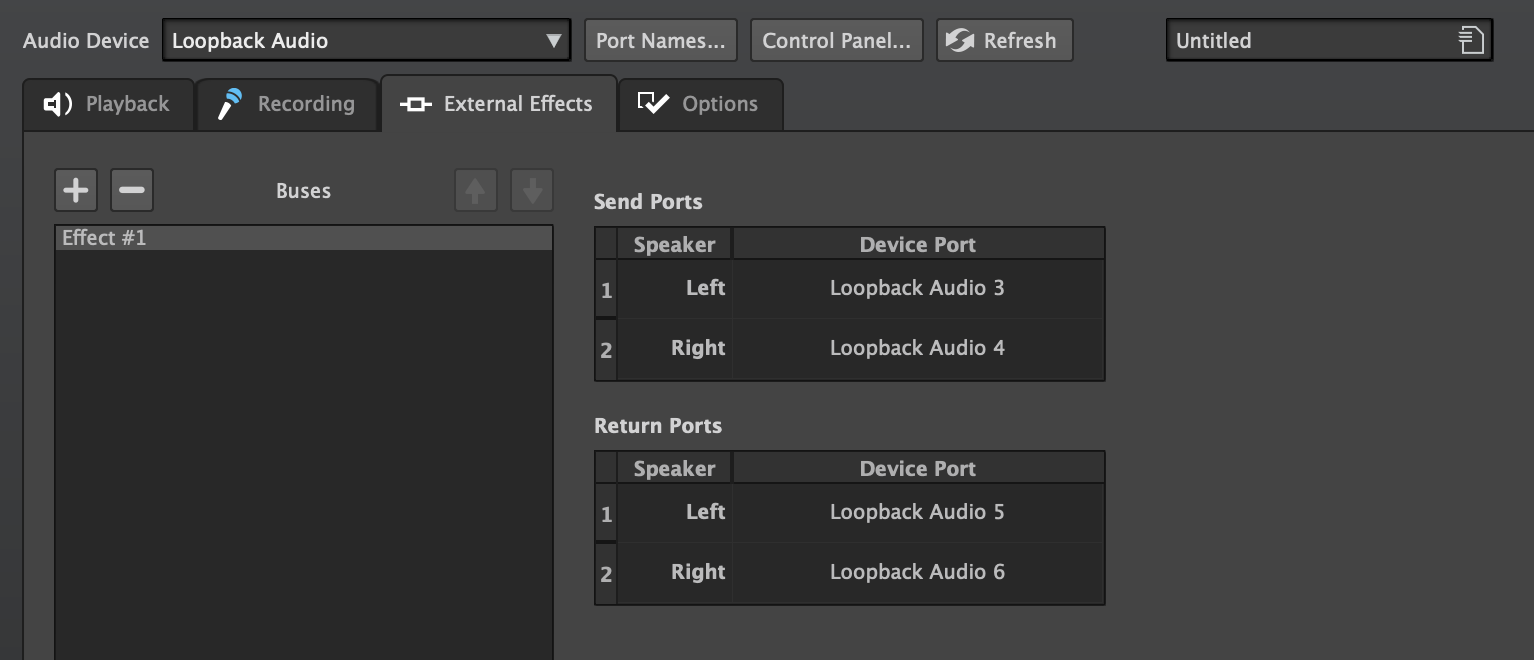
-
For External Effects (if you need to), you can set these up for Send on channels 3 & 4, and Return on channels 5 & 6.


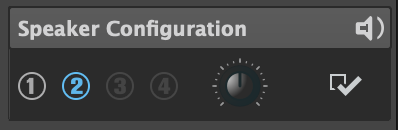
Speaker Configuration
While you can hope for the application DAW to always automatically handle your playback monitoring, this may not be so simple for the DAW to know what you want exactly when you want it. So, one great option that is cleverly placed in the Audio Device configuration is assigning which output channels you want to route to each Speaker Configuration. This allows you (obviously) to switch between monitoring the Returns from the analog mastering chain, and WL’s own playback.
More, you can switch between them quickly with shortcuts or MIDI interface commands.
Ok, now the fun part…
How can I make it so I can use my Benchmark DAC, along with room-correction to grab whatever audio I want to hear through my speakers to always go there?
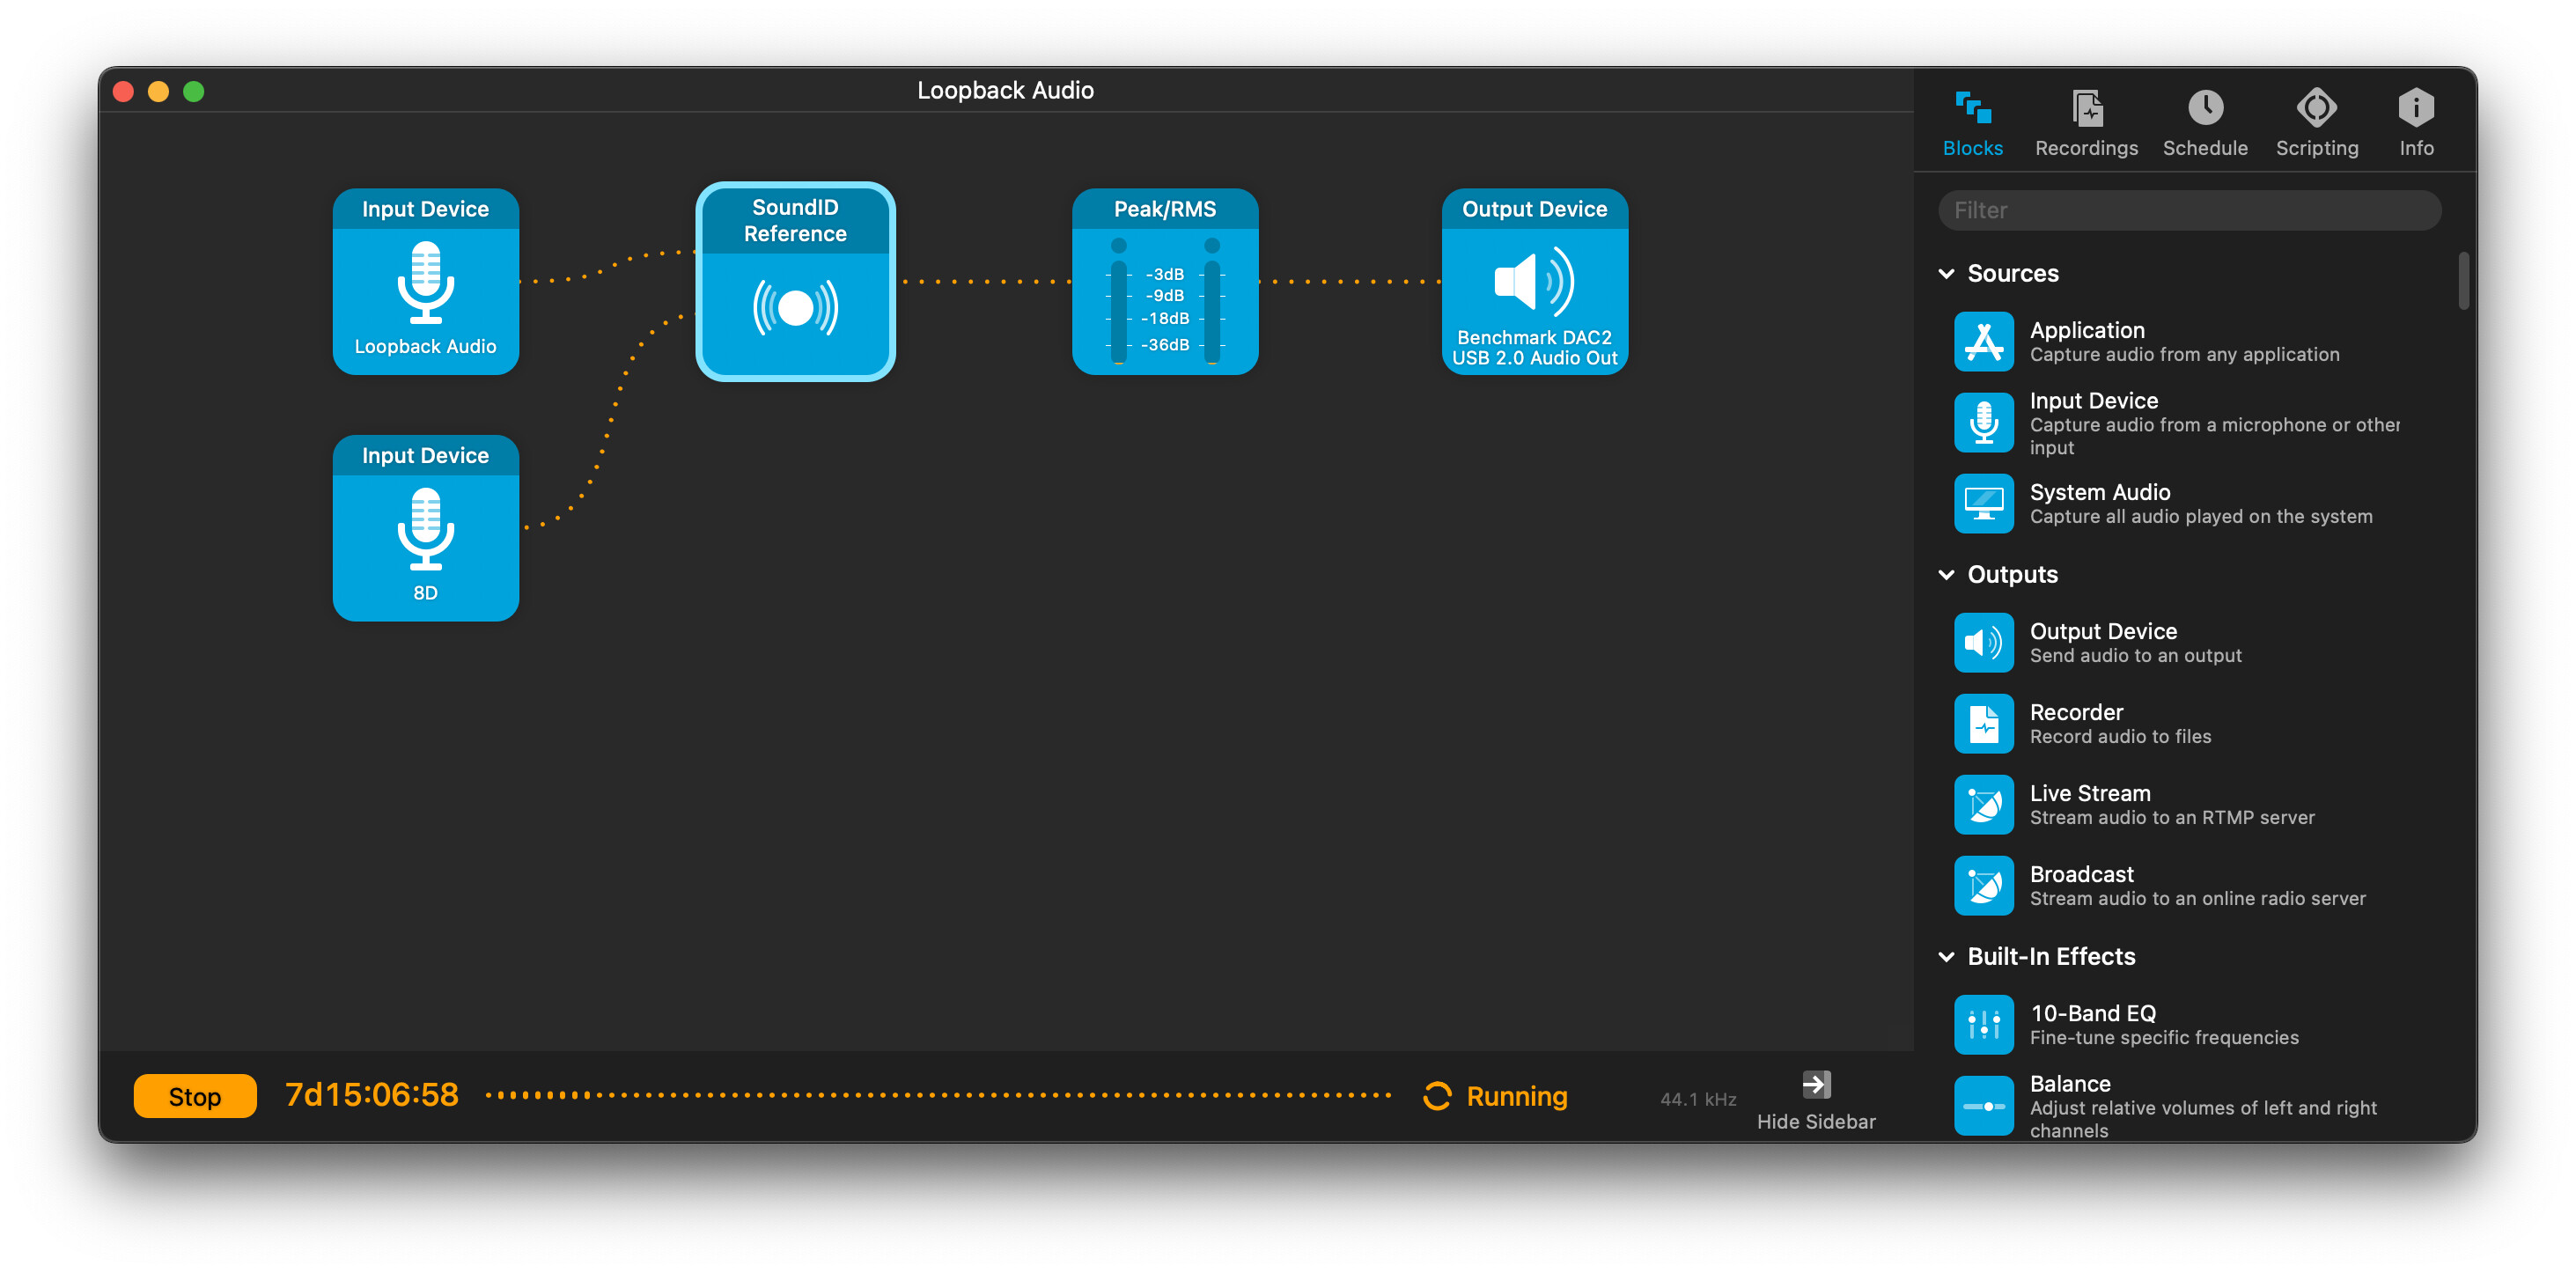
Enter Audio Hijack.
-
In this software, which does way more than what I’m using it for, I can drag an Input Device block to the HiJack’s grid, and select any of the outputs from Loopback Audio. I also have another input block to be the Return on the MOTU 8D from the analog mastering chain, so I can listen to that during playback pitch/catch of the mastering chain.
-
Here, I’m choosing Loopback Audio, channels 1 & 2, which, incidentally, is mapped to WL’s Playback Bus.
-
Next, I pipe that input block to a plug-in block, which hosts a single audio plug-in. Here, I’m using Sonarworks Sound ID with my room calibration loaded.
-
I’ve added a meter, so I can see this output level in my screen at all times.
-
Finally, I’ll set an output to be my Benchmark D/A converter, which feeds my audio controller, then my amp and speakers.
NOTE: This software doesn’t automatically on a machine reboot, so you will need to add it to start under your Mac OS user profile. It can then be set to automatically start running, since it’s not a service that’s set and forget. The good news is, it saves your last state, and you can add other chains to do different things, like record a video with audio from other sources, for example.
In summary
-
WL allows for one audio interface, and Loopback Audio provides that virtual interface.
-
With Loopback Audio, I can map the outputs of WL busses to any physical hardware audio interface (and back into WL on separate channels).
-
I can now use an analog chain as in an FX Chain or Playback/Record between different tracks in a Montage.
-
I can use room correction without having to enable/disable it for passing audio through the mastering chain.
-
I can still use my metering on a separate audio interface, not affected by room-correction.
Again, as I alluded, this is rather complex, but I managed to have this work out for me with minimal effort after it’s all set up and tested. Below is a diagram of how it all connects together.
3 Likes
It’s crazy what a missing option in your (favourite) DAW can do. But what would life be without a little thrill and excitement? ![]()
I’m sure there are others who would be interested in hearing your experiences. ![]()