Some ideas that might help…
HALion sounds were initially designed to ship with tracking DAWs and be flexible for a wide variety of musical styles and mixing approaches. They are targeted to consumers who typically have a more proper monitoring setup (flat response, well placed speakers/headphones). They can require more understanding of mixing and post production techniques. They start out with ‘way too much’ of everything, because it’s easier to ‘take away’ or lower frequencies from a mix you do not desire, than it is to boost or add them.
In contrast, Sounds for Sibelius were designed to ‘work together out of the box’ and be a plug and play foundation for a consumer base that typically works with ‘consumer grade’ speakers or headphones. Sibelius for sounds isn’t really meant to master a convincing mock-up, but rather, to be something a composer can sit there for hours at a time, work with, and not get ‘listener’s fatigue’.
The good news, is that it’s possible to shape the stuff that comes with Dorico to sound good in whatever speakers you happen to use, and go easy on your ears during prolonged work sessions. This can be VERY different from the settings you want to use when ‘rendering’ a recording of the score to share with the public over a stream, or fire off to a colleague to play on his iPad.
If HSO is not cutting it for you [I’m not crazy about the Solo Strings in HSO myself],
Obviously, if you have access to a Library that works better for your needs out of the box, then use that 
Otherwise,
- Try the GM Variants for string instruments. There are also solo string instrument alternatives in the included SE Artist and Pro packs. The main difference between the GM and Artist sounds for solo strings, is that the Artist ones have some ‘effects’ pre-applied in the HALion engine as part of the program, and have ambiance controls to shape that effect mix up somewhat. In contrast, the GM variants are very ‘dry’, and it is intended that you build your own effects (either in HALion itself, or via plugins in the DAW mixing console).
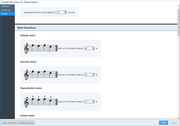
In Quick Control (QC) position 3 for the GM variant of Solo Strings that shipped with Dorico (Part of the SE Basic Content Pack) there is an “Amp Velocity” setting which can be used compress the dynamics a bit. Lowering this value causes a more pronounced attack at lower key velocities. If you want less bite on the attack at lower velocities, then pull QC3 to 100%.
For tutti strings, try some of the alternate strings that come in the SE Artist and Pro packs that shipped with Dorico. These have generic ‘string’ section names and are meant to serve for all of the bowed string family. Some of these are quite nice and include some key-switched articulations, along with quite a bit of sound shaping parameters. Again, be aware panning is a big thing, and with section strings some stereo imaging or a little chorus (with included VST plugins in Dorico Mixer inserts) can help achieve a nicer mix as well.
-
Be sure to ‘pan’ the ensemble out with the Mixing Console panners, so everything isn’t competing for space at dead center. Moving channels left or right can be huge in making space in a mix and cleaning things up.
-
Anytime you use the exact same instrument patch/program for more than one stave, again, make sure they are panned to different positions in the stereo field, and take a minute to go into HALion and tweak them a bit so they are each different. I.E. Detune them a few cents, apply different timber shaping filters, etc. This can help avoid ‘sample phasing’ issues where identical copies of sounds in a mix can ‘cancel one another out’ and not be heard well at all.
-
Get a nice MultiBand compressor plugin and spend a little time learning how to use it. reaXcomp is a very effective plugin, and it is free to download and use (No registration required. No ads, vicious installers, or other annoying bits). At first, just use it on the Master channel until you get an idea of what it can do…eventually you might find reasons to use it (or a single band compressor) on individual instruments as well.
You can use band compression to isolate frequency bands you really want to hear and bring the ‘forward’ or push ‘back’ in the mix. Just as one example, String attack is typically quite a bit higher in the sonic spectrum than the fundamental pitches (similar to consonant sounds in speech/singing). Compression can allow you to isolate that band of frequencies and better place them in a mix. I.E. If you want ‘less bite’, you could compress the frequencies of the fundamental pitches to be ‘louder’, and pull the entire channel down in gain a few db. I.E. If you want ‘more bite’, just compress the 5k ish band so it cuts more into the mix.
-
EQ helps as well. There is already a nice one built right in to the mixer, plus there are included slot plugins to choose from. Sometimes EQ is enough, and you won’t need the compressor mentioned above. Again, it can be used to find a space in the mix for the part being played on the stave, and shape up the frequencies you want to stand out more in the mix.
-
Sometimes the ‘tone boost’ plugin comes in handy. I use it a good bit (but with conservative settings) with Cello and Bass solos so they punch through a mix better.
I say all this as someone who is using monitors that’ll shred my ears if I try to work with Dorico for long periods without warming things up a bit with some stage or studio reverb (I like to compose with a scoring stage convolution reverb), and cutting out a lot of the ‘top end’ of the mix (On my setup, from 5k to 6k (Sh and Ess) gets particularity annoying during long work-sessions, so I pull that range way down when composing). When rendering, I typically need to put it all back in there, but for sitting here and working all day, it’s just ‘too much’. So experiment with different setups on the Master Effect chain to begin with. As you learn the tools, you’ll also discover good times and places to put plugin effects on ‘individual instruments’ as well.