Can someone please help me understand this very basic aspect of mixing that I am lacking.
I am following this guys video who happens to be using cubase 7.
In his mixer he has a “pre” section that he enables (i do not see this anywhere in cubase 8 unless i am missing something), where he goes in and enters a gain value so that it adds together to get each track around -18dB.
In the track I currently have, I am using Superior Drummer in multi-out mode. I also have a bass track I laid down. I want to get everything at a proper level before I go any further. The problem is I don’t really understand what I am doing. Prior to this i’ve always just lowered the volume faders of each track until the “channel volume” on the left is around -6. The peak meter volume on the right i have to admit I dont understand what that is.
Could someone walk me through setting this up in cubase 8 so that I have everything around -18dB? It’s hard for me to follow the guys video because things are moved around a bit in the newer version
Thank you roy!! so to clarify- if i record my guitar tracks and lay down some midi drum patterns, hit play and then observe where the levels are reaching and then adjust the gain in the ‘pre’ section of each track accordingly, this is the same as inserting a trim plugin on each track, correct?
What version of CB8 are you using? I use Pro, and the Pre pane is exactly where it is described in the video. Note, that you must have it activated in the Racks menu. Perhaps you’ve missed that.
Also note that there, obviously, aren’t any settings for MIDI tracks.
That is one approach to certain aspects of gain staging but seems slightly flawed. IMO this video series could benefit from more clarity in its descriptions of peak and RMS (average) levels and how to use a peak meter as opposed to a VU meter.
IMO the first thing to get clear and fully understand is the difference between peak and RMS levels, and the difference between digital peak meters and VU meters. There’s lots of information on the internet. Also see the master meters in Cubase for an example of a combined digital peak and RMS meter.
The channel meters in Cubase are digital peak meters which don’t give a precise idea of the RMS (average) levels of the signal, so when using these for RMS (average) levels you have to do some guessing. You might try setting the fallback time to 10dB/sec instead of the default 12dB/sec in Preferences to get a better ‘picture’ but you are not seeing RMS levels on the meter. The apparent average on these meters is higher than RMS and what you see depends on how you set this fallback time.
I found them, thanks. (using cubase pro newest version btw) Last night what I did to experiment with this was load up a full kit in superior, paste in a midi drum solo, let it play through and then i went in and adjusted the gain in the ‘pre’ section so everything was around -18…this seemed to work ok for everything except the overheads track which was already at -26 or something…I don’t know something still doesn’t feel right. Now the poster below is saying it’s a flawed approach and i am royally confused again lol.
I was wondering about the MIDI thing you just mentioned as in my case i’m almost always starting a track with 90% MIDI instruments and two or three audio tracks from my axe fx.
How does this change things?
I also saw this guys video where he shows that you can just lower the faders initially but that it leaves you with no room to move them around in your mix, so he suggest’s using a trim plugin (which i assume is the same as lowering the gain in the pre rack). Here is the video I am referring to: https://www.youtube.com/watch?v=I2-IDkCMWFo
Thanks for being patient with me while I figure this out guys. It’s odd that i’ve been making music ITB for so long and I dont know this
I will do some research on what you described and see if that clears things up. I’m just wondering how all of this applies to someone like me who uses mostly ITB midi instruments and I tend to get the structure laid down and then mix as i go.
Also you mentioned using the level control of my audio interface during the moment of recording. The only time i actually record an instrument is when i use my axe fx to lay down guitar. Outputs of the axe fx go to the inputs 1 and 2 of my saffire pro 24, which goes firewire to my PC at 48kHz sample rate. On my usual distortion patch, i have the gains on my saffire inputs set up so that they get as close to red as possible without ever touching it, and the amp blocks within the Axe fx it self have their levels set to avoid clipping as well. Typically these come into my DAW on a mono audio track where it is always waaaay way louder than any of the midi instruments I am using until i go in and lower the faders in the mix window.
So basically i don’t have any microphones in here and everything else i use in my tracks is VST based midi instruments. Does this change any of what you said?
Not really because gain staging applies to VST instruments as well but you just control them differently since they’re not coming on an input buss or through your audio interface. The video you linked is telling you one basic thing: Don’t have your tracks recorded with so much signal that you run out of headroom when adding FX, EQ and when they’re all summed together at the master fader. What he did was instead of pulling down faders to lower his mix, he simply lowered the signal level using the PRE GAIN knob (signal before it hits anything on the channel strip) so that his faders remained at the zero position on the channel. I don’t agree with this technique but it works I suppose if you’re working on projects already tracked poorly. For you though, I would make certain that you are watching the input buss in Cubase when recording your guitar and not the channel fader. You want to get the sound and signal you want from your stomp boxes routed into your audio interface. The output of your interface as it hits the input buss in Cubase should be between -18 and -12. That way, you’re getting the sound you want with plenty of headroom for mixing and summing with other tracks to the master fader. For VST instruments, you simply use the output control in that instruments editor to set the level - same concept - leave headroom. Don’t be concerned about having a waveform that is not filling up the box - that’s a rookie myth. Use your ears instead like what you’ve been doing - which is why this probably hasn’t been a huge issue for you since anything that was clipping you simply dragged the faders down. Since you weren’t clipping during the recording, you were fine but with faders pulled down to compensate.
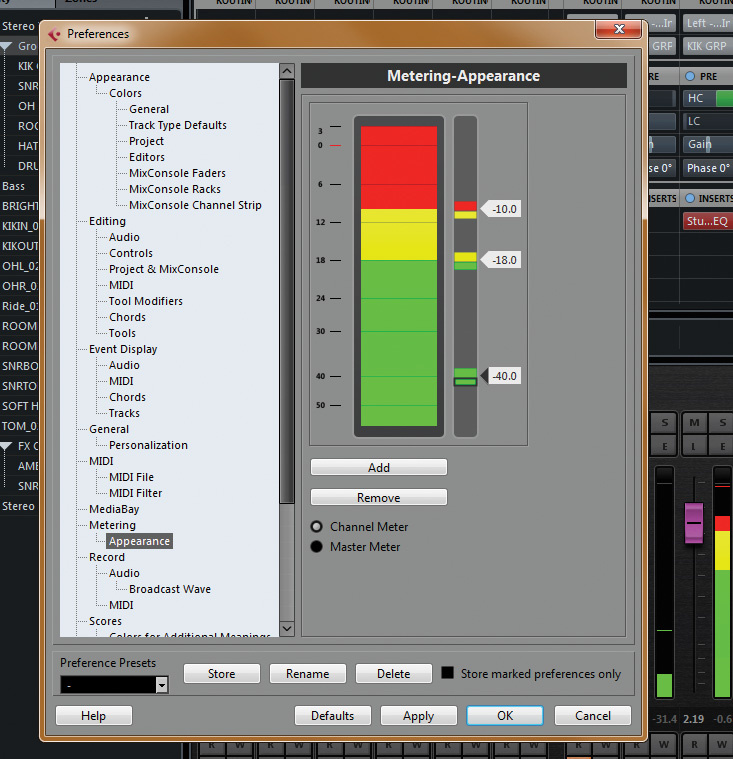
Something to also help you out a bit would be to change the appearance of your metering in Cubase so you’re seeing red signal activity well before zero. Do this in preferences: Metering - Appearance.
By input bus you mean the ‘Stereo In’ Fader, correct? By lowering that to about -12.7 It made my guitar tracks look like the attached picture (two middle tracks), they used to pretty much fill up the entire track like a sausage. Is it ‘ok’ to have them this small? It sounds fine when everything else is balanced with it but I just want to make sure I’m not commiting some kind of pro audio felony here.
Someone somewhere a LONG time ago had told me you want them as big and fat as possible to avoid background noise but TBH this was referring to mic’d instruments in my bedroom at the time. Bad advice?
Yes, the mono or stereo input(s) are what you want to monitor and it is here where you would want to insert effects that you wish to make permanent into your recording: compressors, gates, etc. Your tracks look great and you can visually see the amount of headroom you have. You’ll notice in the video clip you linked that the author states the same regarding waveform size, etc and having sausage-like tracks has no relevance today with the amount of dynamic range and low noise floor available in 24/32 bit recording. With 16-bit however, the limited dynamic range posed more of an issue, if at all.
Glad to help Mike. To clarify on that fader pic, you actually need to click on the small color bars next to the dB #s to be able to customize those colors. It’s a bit convoluted but is fully editable.
Proper gain staging starts at the beginning of the audio chain. i.e. you need to start at the pre-amp and work your way through the audio chain. Also, you should always use static test-tones (sinus) when gain staging. Then it doesn’t matter of the meters have peak or VU ballistics.
Thanks for this thread. I have been using a PSP VU meter to get the average 0db VU i,e -18 but I am interested to see that you can configure the meters in Cubase. I’m not quite understanding what SuStudio means about the “small color bars next to the dB #s”. This would be very useful to me. Thank you in advance.
True. IMO it still helps get better recordings / mixes if you understand the difference between the two (and the difference between the channnel meters and the master meters in Cubase), especially with regard to -18dBRMS. You cannot see RMS on the channel meters. The OP may have been confused by this.
I don’t think it’s anything to obsess about too much. I tend to lower everything with the input gain by an average of -6 db. A big fat kick might get dropped by as much as -10 db but hi hats maybe -2 or -3 db. Just make sure you have plenty of head room and you’re not pegging the 2 bus.
I’ve been getting much better results since doing, for sure.
If you want to change the default colors for the dB range on the faders, just click the small areas as indicated by the arrows on the pic. You’ll be able to colorize the dB range to taste - just play around with the dB settings that trigger the different colors that best suits your style. I don’t throw lots of processing on my tracks post tracking so I run closer to 0 before I want clipping to appear.