
I want this first ending to only cover one measure but I can’t seem to make that happen. The chord in the first ending extends back an 1/8th note into the previous measure so when I select the chord and then enter a first ending Dorico creates a 2 bar bracket for the first ending. I’ve tried dragging the handles to reposition the start of it in Write mode but Dorico won’t let me change the start position. I can change it in Engrave mode but I suspect that that is not the correct procedure.
You can definitely drag the start handle of the first ending in Write mode – it just looks like it’s not moving until you get to the next bar.

Or:
- Delete the current first/second ending
- Start Note Input mode
- Position the cursor at the start of the whole note
- Invoke the Repeats popover with Shift+R
- Type
endand hit Enter
1 Like
Another way would be to split the tie (select the chord and press U), create the ending, and then re-input the tie.
Oh. You’re right. It doesn’t look like it’s dragging until I get all the way into the next bar. thanks!
Now how do I get the first notes in the second ending to have left ties?

![]()
![]()
![]()
![]()
![]()
I don’t understand emojis and why people respond with them.
Are you laughing at me for asking this question in a forum?
There are a number of workarounds for this; see this post.
If you don’t need correct playback and are happy with the reversed l.v. tie solution, here’s a zip file with a folder that you can drop into your user scripts folder. It contains 6 scripts – creating short, medium, and long backwards l.v. ties above and below a selected note. (The number in the script name refers to the length of the tie in spaces.) Just select the second ending note where you want the tie and run the appropriate script.
Add Second Ending Tie.zip (2.5 KB)
4 Likes
No, no, no, not at you of course, it’s more like a running gag in the Dorico community… ![]()
Dorico can’t do this yet, quite a shame at version 6.0… you need to be working with l. v. ties from the properties panel and reverse them in engrave mode.
Sorry again for sending you in the wrong direction, but everyone new to Dorico had to deal with this issue, me included…
Then use words like a grown up.
But I love smileys! ![]()
And: How do you know I’m not 14 years old? ![]()
1 Like
It took Sibelius 30 years to solve that problem. Let’s hope the Dorico Team finds the solution faster!
3 Likes
Thanks Asherber,
I don’t care about the playback. I’ve downloaded the file and unzipped it. I don’t know what a script is. The files are all .lua files. What is that and how does it give me a left tie?
I know how to do a LV tie but that only seems to extend the ties to the right, not the left of the notes.
Dorico user config files are under c:\Users\<username>\AppData\Roaming\Steinberg\Dorico 6 on Windows and /Users/<username>/Library/Application Support/Steinberg/Dorico 6 on Mac.
Inside that folder there might be a folder called Script Plug-ins – if not, you can create it. (Note the hyphen in “Plug-ins”.)
Unzip the zip file and place the folder it contains inside Script Plug-ins. If Dorico was open, then restart it.
Now when you go to the Script menu in Dorico, you’ll see the “Add Second Ending Tie” folder, with the scripts inside it. Select the second ending note on which you want the backwards tie, and then select one of the scripts, depending on whether you want the tie above or below the note, and how long you want it.
The scripts basically add an l.v. tie and then go into Engrave mode to flip and extend them so that they go backwards.
2 Likes
It’s really cool to have those scripts. Nevertheless, the last workaround involves hidden notes tied to the apparent note and this is a very easy process, providing you’re using Dorico 6 (that has the hide note and hide stem properties)
Ok. This is way too complicated for me to figure out and not worth it for this particular project. I can sense this will take me some time and cause frustration. thanks for the help. I’ll return to this later if I have a project that requires this.
Then you can follow the first 40 seconds of the video explanation linked by @asherber above, for the visual result using hidden and tied grace note (ignoring the second part of the video, that handles the playback. And no script involved ![]() )
)
In Engrave, just set the tie offset x-values to some negative numbers.
It’s actually not just the x offset, because when you make that negative, the tie turns upside down. Here are the settings I had to change for a short backwards tie:
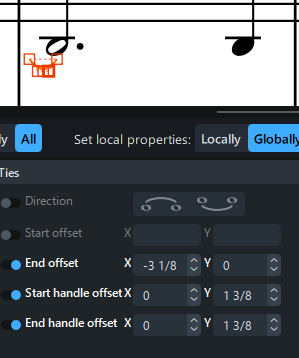
Edit: I guess you could also do it by adjusting both the start and end x offsets, but I wanted to keep the start endpoint pinned the way Dorico has it.
I move both the start and end offset (essentially a horizontal shift of the tie), so it does not flip.
(As usual there are many ways!)
2 Likes