Question for Cubase and Logic Pro X experts

Until two days ago I had not owned or used Cubase at all. I have good experience in Logic Pro X, maybe not 100% but I can find my way around it.

So if there’s anyone here who knows both well, I have a few questions:

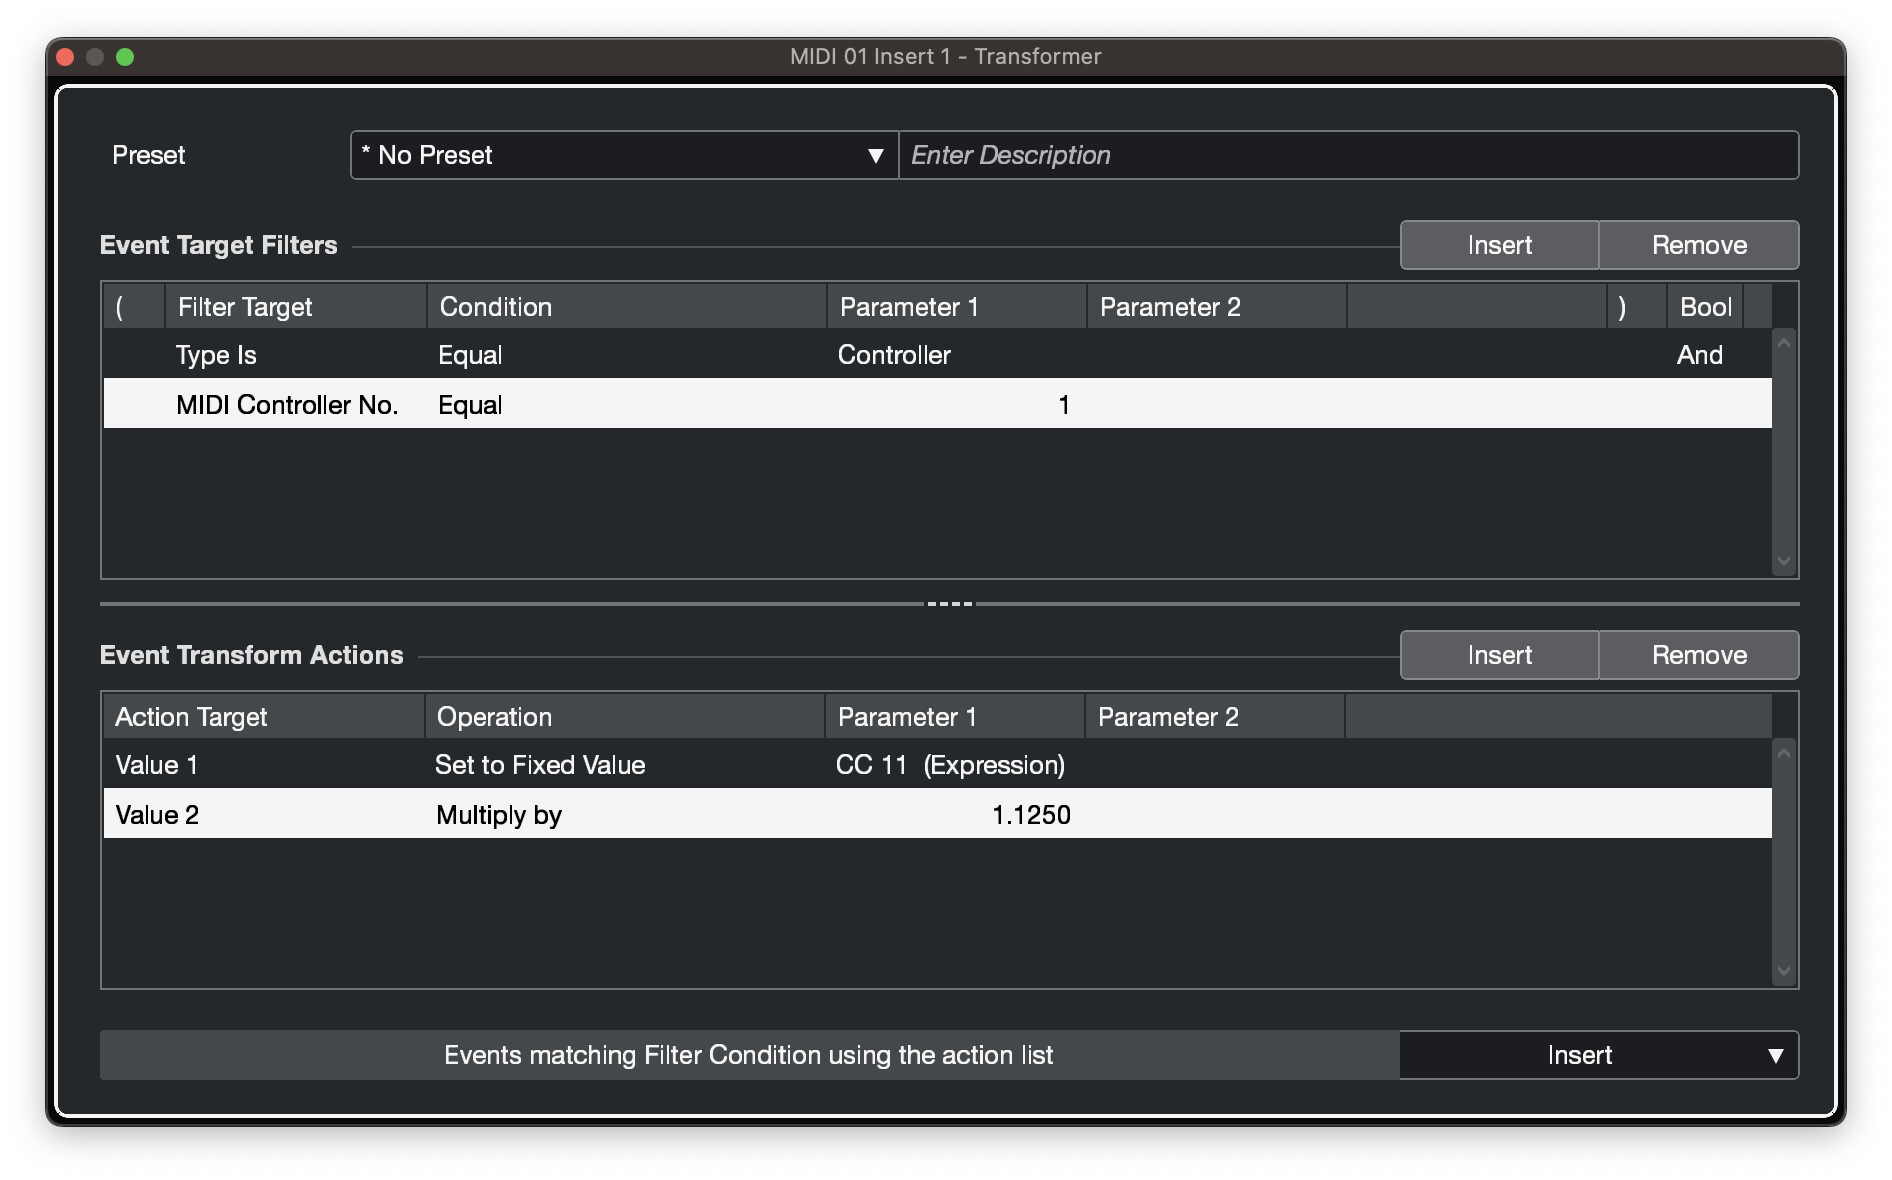
  1. Does Cubase have anything like the MIDI transform module in LPX?

  2. Is there something like the CTRL+T in LPX that allows you to select a range of MIDI notes and puts handles at the beginning and end of the selection so you can enlarge it or shrink it?

  3. The panel at the top in LPX where it shows some information with black background and green characters, like the current position, bar, etc. also shows the note being played in the MIDI piano at that moment. I enabled all the items with the toolbar gear, but I can’t find it.

  4. There doesn’t seem to be a modifier key + wheel to zoom in and out vertically, at best I can put the pointer over the vertical zoom indicator on either the track area or the MIDI editor. Is that correct, or there is a modifier key?

And I’m sure I’m forgetting a lot of things, but this is it for now. Thanks to anyone that takes the time to reply.

1 Like

Hi,

Yes, Cubase has Logical Editor.

If you mean stretch the MIDI data, you can do so. Either you can use the Object Selection > Sizing Applies Time Stretch in the Project window, or you can use the Logical Editor.

We call this Info Line. You can see all information about any selected object. In the Key Editor, you can see the currently played Chord. The Cursor position you can see on the Transport Panel. In the Toolbar, you can enable Time Display to see it.

Unfortunately you are right. Use Shift + G/H Key Command, please.

Thank you, Martin.

I see. Looks very complete, much more than LPX’s MIDI Transform, am I right? I see quite a lot of functions there, LPX has about 20, maybe?

Weird. That seems to work great in the tracks area, but if I select the same thing in the MIDI editor area, meaning activate the “Sizing etc” to the pointer, and I try to scale up the notes horizontally, they all grow in length at the same time as much as I click on the right edge of the rightmost note and move the mouse to the right. What I do works in the tracks area, so I’m confused. Did I miss something? I probably did.

You mean I can see the chord being played in the piano notes on the left, right? But as far as I can tell, there’s nowhere I can see the actual note or chord like in the LPX info panel, is that correct?

Cool. And what’s the same thing to zoom in or out horizontally?

Hi,

Right. It’s very complex and powerful in Cubase. Moreover you can use the Input Transformer, which is (a bit limited) Logical Editor, you can apply to the incoming MIDI data. Then there is also Transformer, which is (a bit limited) Logical Editor, you can apply as MIDI Insert and process the MIDI data in real time.

Unfortunately this works in the Project window only.

In the Status Line of the Key Editor, you can see the Current Chord Display. This shows the chord, which is bellow the playback cursor. We don’t have a global chord display. If you use the Chord Track, of course you can see all the Chord Events in the Project window.

G/H is Zoom Horizontally, Shift + G/H is Zoom Vertically. :wink:

That leads me to another question I realized today when working with it some more. I have a MIDI modifier setup in LPX that basically makes the instrument think that the CC1 automation is also CC11 automation. I use this sometimes on instruments where MOD and EXP usually go hand in hand, like Spitfire ones (at least the ones I have, which are all with their native engine, which has the typical large knob and two faders on the left, which in pretty much every single one of their videos, they use hand in hand.

This saves a lot of time, because you can set it to different ratios, not just 1:1, but 1:1.25 for example. The setting itself is not “ratio”, but I mean, that’s what you achieve.

I’ve taken a good look at the more advanced MIDI features, but so far I couldn’t find it. Is it possible to do this in Cubase?

So, if you have a bunch of notes in the key editor (that’s the equivalent to LPX’s piano roll, right?), and you want to select a few, and either compress the whole selection or enlarge it, what’s the fastest way to achieve that?

Say this for example, I want to “shrink” all these notes proportionally in length and space, so it’s still the same note progression, but instead of ending at bar 179, it ends at bar 176:

Finally, another question. Is there a way to show the marker track that you want in the key editor? Say for example you want to place specific notes at specific markers, and having the markers there, like you can in LPX, helps visually, rather than look at the main tracks area, see the marker, see the bar where it’s at, and then in the key editor placing the note at that bar. Does that make sense? I know this is not something that a lot of people would do, but I have my methods like everybody else.

Hi,

Yes, this is possible. I wrote this Logical Editor multiple times here on the forum.

Filter Target
( Type Is | Equal | Controller | And 
 Value 1 | Equal | 1 )

Action Target
Type | Set to fixed Value | Controller
Value 1 | Set fixed value | CC 11 (Expression)

Function
Insert

You have to cut the MIDI Part. In the Project window resize the MIDI Part (shorten it from bar 179 to 176, while using the tool to Time Stretch. Done. (Or you can glue the MIDI Parts back after.)

Exactly.

Yes, you can do so. Show the Global Tracks in the Key Editor, please.

This would be where exactly? I opened the logical editor, did my best to enter everything as you put it here:

And I saved it as a preset, then called it from the track MIDI Modifiers. But it doesn’t even let me load the preset. I also tried the same from the MIDI inserts just for the sake of it, and same result. If I load any of the factory presets, I can see them, but this one doesn’t load at all.

Hi,

Of you created this as the Logical Editor, use it again in the Logical Editor as the process (so the data will change).

If you want it to be changing data live while you play them, please use the Input Transformer. There is one that affects the entire project but you can also define one for each track individually.

The multiplier of value 2 sets the ratio.

1 Like

Awesome, thanks. So that would work while playing live but also if I’m playing back the project and the track is reading the CC1 automation? Meaning, it would read the CC1 automation and send it to the instrument as both CC1 and CC11?

Hi,

I would go for the MIDI Insert.

I don’t think this is possible in Cubase. You’d have to manually copy CC1 to CC11.

Hi,

Why? The Transform MIDI Insert works for me here…

1 Like

Yes! That works perfect. I can see the two faders in the Spitfire instrument going perfectly side by side because I set the ratio to 1.

Thanks!

1 Like

OK, I don’t know how I did this the other day when it worked, but for the life of me I can’t get it working again. What are the steps? I mean after getting this in the logical editor, how do you make it work?

At the beginning select the events you want to work on.
At the end press the Apply button in the Logical Editor.

Hi,

Either you select the whole MIDI Part(s) in the Project window (then it’s applied to the whole MIDI Part(s) or in the Key Editor sleeve dedicated MIDI Events.

Didn’t you use the Transform MIDI Insert by any chance?

I think that could’ve been it, but not sure. I’m trying this now, but I can’t get it to work like the other day, which is the same way I was doing it in Logic, meaning if I play the track, and the track has CC1 automation already, or even if I play live and I move the MOD wheel, that will transfer to CC11 at the same time.

I remember doing this the other day with the same setup you showed me in your screenshot, and it was working. I remember doing it in the project I have open now, on a violin legato track with Spitfire’s Appassionata Strings, which has the typical Spitfire GUI with the two faders, EXP is the one on the left, and MOD on the right. So I remember them going up and down at the same time, together.

But now it doesn’t work, so maybe I’m wrong. Inthe screenshot below, you can see that I don’t have the MIDI transformer insert enabled. In that case, when I play the track, it plays as it shows, the fader in the instrument goes up and down following CC1 automation:

If I enable the insert transform, it transfers the CC1 automation to CC11, but doesn’t leave it in CC1:

I tried many different things, but it always ends up the same way. What am I missing here?

Hi,

Set it to Insert, not Transform, please.

Ding ding ding we got a winner!!

Thank you Martin. But you don’t need to ask me to please do it, I’m happy to do anything you suggest, after all, you know a lot more than me about Cubase.

So just for anyone else who might be looking for this in the future, this is the setup:

The green rectangle in the instrument is not part of the setup, it’s just to show what the setup achieves.