Hi, just started using Cubase 6.5 about three weeks ago. I was using Sonar for about 4 years and I’d finally had enough.
So far, everything seems superior in Cubase, even basics like crossfades, envelopes, piano roll editing, etc., are much more powerful and operate more smoothly, so I’m glad I made the switch.
One thing that I can’t seem to figure out though: How do I solo an FX channel? I’ve set up a reverb on an FX channel and created a send on the source track but I can’t seem to solo just the FX channel, it will also solo the source track.
Now I realize that logically this makes sense, if the source is muted, there is nothing sending to the FX channel. But there has to be an easy way to listen to just the wet portion of the signal.
I found some past forum posts that mention using the Listen feature on the Control Room mixer but I can’t figure that out. I’ve scoured the Operation Manual with no luck.
I’m hoping there’s a way to just listen to the FX channel with a single button press basically, I was able to do this in Sonar and so far it’s the only thing Sonar does better than Cubase as far as I can tell. Any advice would be greatly appreciated!
I just wanted to welcome you to the Cubase forum since I’m also an ex-Sonar user myself. Like you, I used it for a long time (over 5 years) and simply got fed up and finally decided to try Cubase about 8 months ago. It was the best move I could ever make. Cubase is way superior than Sonar in almost every aspect that matters. Sure, Sonar has some really cool features too. But they are more doo-dahs than anything. You already know that though. In any case, welcome to the forums and I hope you keep enjoying working with Cubase as much as I do.
Okay, that works, thank you. So when it comes time to export the ‘Stereo Out’ I’m guessing it will work as expected since now the Control Room has essentially taken over the role of the ‘Stereo Out’ Output?
Another question: When I just hit Listen on the FX channel and then I’m hearing an attenuated version of the entire mix(until I solo a track) where is that input coming from? In other words why am I hearing output from tracks from which I have not yet configured the send?
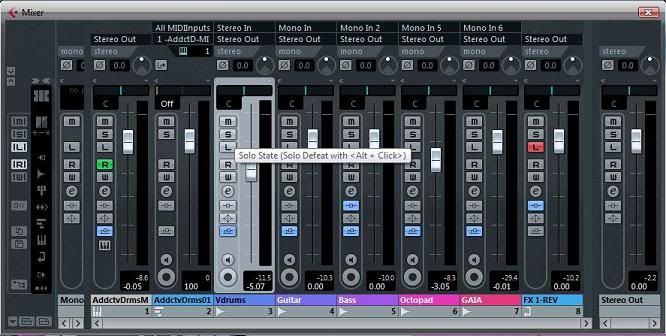
Regarding mixer behavior, here’s another question, why does the below happen?(screenshots will explain this much more easily):
First, I pull up the mixer:
Then I solo a track:
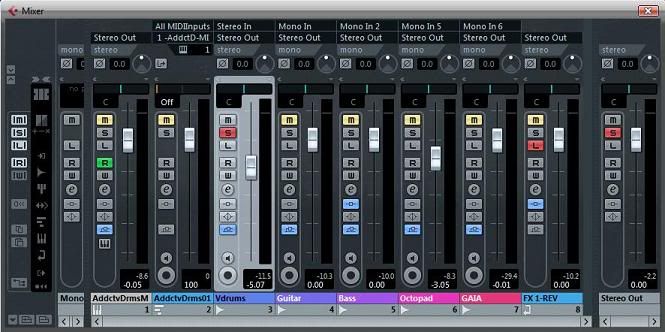
Then I just want to hear the dry version for a second so I un-solo the fx:
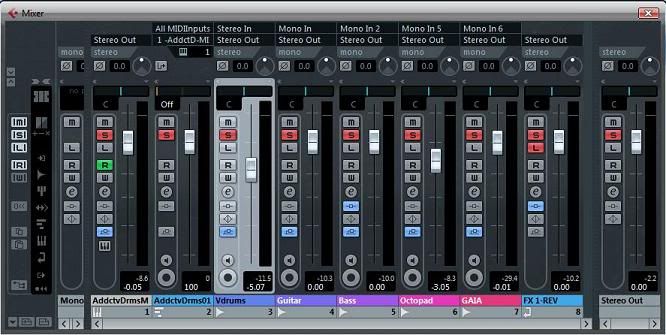
Then I re-solo the fx track, but as soon as I do, it solos ALL tracks:
Why is it doing that??
(Note: It makes no difference whether the fx track set to listen or not, it’s the same behavior either way.)
Hey, thanks for the greeting! What was it about Sonar that drove you nuts? For me(v8.5) it was seemingly buggy behavior, like sometimes I would try to select and drag all tracks and it would only move one or the fade would only apply to one. Also crappy envelope tools. And the piano roll was clunky and tedious. And yeah Sonar can do a lot of stuff but so much of it not really practical and it supposedly had powerful midi editing tools but you had to do it all through the CAD menu…I’m not a friggin’ software engineer! Plus the workflow overall just felt slow and tedious, I had taken to calling it Slownar by Mistakewalk for lol’s.
Honestly, Cubase has been a bit frustrating figuring certain things out, like just bringing up a piano roll for a VST took me much longer than I’d hoped. And I just spent 15 minutes trying to remember how to pull up the GUI for my reverb! And of course the above issue with soloing tracks. But I know I’m on the early part of a learning curve and I have faith from what I’ve seen and researched that I’ll be happy after several months of pain. Is there something better than the Quick Start Guide and the Operation Manual .pdf as far as hard documentation for this beast? I’ve looked at a few youtube videos here and there by users but(as with most things)I feel like I just have loads of trial and error ahead. I never took classes or anything for Production so I’ve been figuring things out as I go ever since my Fruity Loops days.
Under the listen button on the control room window, you can set the amount of “mix” attenuation when listen is enabled from none to complete attenuation.
Page 177 fig 12 in the manual.
Also export will work as expected when using the control room, that is the master bus fader still sets the overall export mix level.
When soloing an FX track all channels associated (enabled sends) with that FX will also be soloed, where as soloing a channel will also solo any FX (channels) associated with that channel, it’s best to use the listen bus independently from solo, although it can be toggled globally from the control room
So when it comes time to export the ‘Stereo Out’ I’m guessing it will work as expected since now the Control Room has essentially taken over the role of the ‘Stereo Out’ Output?
Just one further clarification on this…The master bus is still existing as well as the control room…it’s just not being routed direct to the physical outputs, but to the Control room.
An ITB export is still of the master bus output & before the control room so any insert effects added to the control room will not print with export.
Also, the lack of a master bus channel is different than what I’m used to. I see in the mixer view if I ‘Show Extended View’ where there are built in eq’s if I wanted to roll off lows on the master before limiting for instance, but what if I wanted to throw a limiter on the master, what’s the proper way to do that?
Not sure I understand your question exactly, but I think this is what you mean…The features available in the extended view is controlled by the icons at the far left of the mixer. These globally set if you want to see inserts, EQ, sends, etc.
To add inserts in control room you also need to show extended view. Here you only have the option of meters or inserts controlled by the little meter icon.
How about reading the chapter about the control room in the manual, that might answer a lot of your already.
And inserts are added where thea are needed. You can use inserts, simply for monitoring, without the need of having them processed in the mixdown.
For me it was Audio Snap 2 not remembering my audio transient edits and giving me error messages when creating a Tempo Map; V-Vocal affecting the sound of my audio by simply inserting it into a clip; Rapture crashing left and right, making old projects un-workable; and pretty much all the plugins that come with Sonar, which would either give you pops/clicks when moving settings during playback (i.e. their new Linear Phase EQ and Multi-Band Compressor) or simply not remembering my settings when closing/opening the plugin window (the Tube Leveler plugin was notorious for this).
The icing on the cake (pun intended ) was the release of Sonar X1. It was a complete disaster. Probably the buggiest release of any DAW in the history of DAWs. It took Cakewalk 4 patches (a-d) to get it to working condition. And let’s not forget the lack of pro features like multi-lane automation, better time-stretching algorithms, file management tools, a gap-less audio engine, etc. The list goes on…it wasn’t until I switched to Cubase that I realized how it is like working with a piece of software that just works. Cubase ain’t bug free, no software is. But, compared to Sonar, it sure feels like it. Off of the top of my head, the only two things I miss from Sonar are the ability to drag 'n drop synths (which Cubase does in a different way via track presets, but it’s not the same) and the Skylight interface (and we may actually see something similar or better in a future Cubase version). That’s about it!
Honestly, Cubase has been a bit frustrating figuring certain things out, like just bringing up a piano roll for a VST took me much longer than I’d hoped. And I just spent 15 minutes trying to remember how to pull up the GUI for my reverb! And of course the above issue with soloing tracks. But I know I’m on the early part of a learning curve and I have faith from what I’ve seen and researched that I’ll be happy after several months of pain. Is there something better than the Quick Start Guide and the Operation Manual .pdf as far as hard documentation for this beast? I’ve looked at a few youtube videos here and there by users but(as with most things)I feel like I just have loads of trial and error ahead. I never took classes or anything for Production so I’ve been figuring things out as I go ever since my Fruity Loops days.
My experience with Cubase has been smooth sailing from the get-go. Actually, I must admit that I did ask a bunch of questions to a friend of mine about scoring with Cubase. But that’s because I had a project I needed to score and Sonar’s Audio Snap wasn’t cutting it at that time (not sure if it has been fixed now). I was able to pull it off though, along with 4 other song projects in just a matter of a two weeks. Now, I did do a LOT of homework and search YouTube/Google left and right, as well as reading the manual (which I still do when I need to figure out stuff). The instructional videos that come with Cubase also help getting the basics down. The following website was of good help, but there are plenty more tutorials online:
Also, searching and posting in the forums helps a lot when you need to find or ask for answers. Most people are really cool and will help you out.
Well, hope that helps a little. Sorry for the long post. Take care!
In Cubase you don’t really need a Master Bus like we did in Sonar. The Stereo Out Bus is your Master Bus, and the cool thing about it is that Inserts 1-6 are Post-fader while 7-8 are Pre-fader (actually, the same applies to Inserts in Audio and Instrument Tracks). You could use Inserts 1-6 for your Mastering plugins (i.e. EQ, Multi-band Compressor, etc); inserts 7 (or 8) for a Limiter, Dithering or Metering plugin; AND use volume automation, all without affecting the behavior of your Post-fader plugins. It’s basically a Sub-Master Bus and a Master Bus in one! I thought that was pretty awesome, but maybe I just get excited over simple things