Easiest way to control 2 different VST synths simultaneously?

Hi, I’m a bit stumped on this one. I have 2 different VST synths loaded on 2 different tracks and I want to assign 2 midi knobs to control each track’s respective filter cutoff.

What is the easiest way to do this?

Track Quick Controls are great, but they can only work on one track at a time.

MIDI remote control is just for Cubase internal functions, not specific VST parameters.

It’s doable with MIDI Remote and Track Quick Controls.

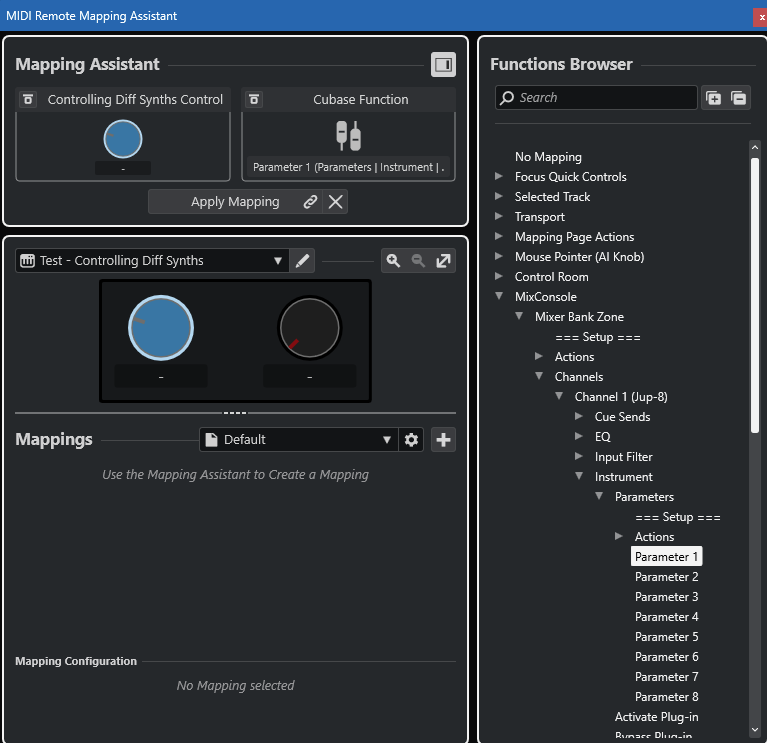
In the Midi Remote, you can create two knobs, and then in the function mapping select:
MixConsole - MixerBankZone - Channels - Channel 1 - Quickcontrols - QC1
for the first knob and
MixConsole - MixerBankZone - Channels - Channel 2 - Quickcontrols - QC1
for the second knob.
(If there are no channels available, you need to click setup (under MixerBankZone) and configure how many channels you midi remote should bank)

Now get the two channels you want to control at the same time banked, as first and second channel of your midi remote (there should be a white bar indicating which channels are currently banked). You might need to bind MixerBank LeftShift and RightShift to a button or move the two tracks you want to control to the top of your project (because the MixerBank doesn’t always bank the selected channel as first MixerBankChannel).

Exactly! It just needs some time from us to be a little structured. As you correctly mention, one can use QC(X) for different mix Console tracks.

I’ve prepared an example for you, @fancy_pance:

Suppose we have two tracks, one with a Jup-8 and another one with Sylenth (the choice doesn’t really matter). At the same time, we’ve prepared a tiny midi remote with two knobs, not assigned to anything for now:

Now, let’s go the mapping assistant, and our aim is to assign the VCF CutOff of the Jup-8 which is our very first track in our mixer Bank Zone. I have previously set VCF CutOff to QC1. What we want to do as @Joshua_Reiners correctly states is to assign the QC1 Of Track1 of our zone to our first knob:

We click on the Apply Mapping button and we’re finished with this knob.

Next we want to do the same for Track2 which hosts our Sylenth VST. Same procedure, only this time, we’re going to select the second track of our bank zone.

Again, we hit the Apply Mapping button and now we’re all set.

Our MIDI Remote (plus the two VSTs involved) looks like this:

Now we can control with our first knob the Quick Control 1 of Track 1 of our mixer bank, and with the second knob, the Quick Control 1 (again but obviously we can always change it to a different one) of Track 2.

EDIT: Almost forgot about it. IF I correctly understood some specs, when VST3 plugins properly expose their parameters, the above procedure is not the easiest way and we can do it the simplest way possible for now.
Let’s take as an example, Retrologue. Say, we have it “somewhere”, in an instrument slot of a track. We don’t even have to care about the track number and/or bankzone. All we want to do is to assign Retrologue’s cutoff to a knob.

Let’s open Retrologue’s UI:

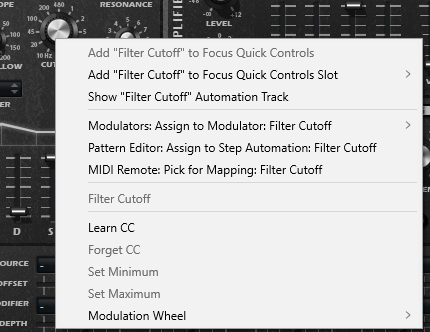
We can see in the middle of the screen, the CutOff Parameter. Let’s right click it:

We now see the option “MIDI Remote: Pick for Mapping: Filter Cutoff”. Click and we go to the mapping assistant where we can select the knob we want and hit Apply again (I will choose the second knob for this example):

Now, as we can see, we have our second knob directly assigned to the filter cutoff of Retrologue in the track we’re on, without caring whether it’s selected or a track of our mixer bank zone. BUT, notice the difference here: While in the screenshot, our first assignment is “generic” (Global), i.e. applied to every single project we have and the very first track of the mixer bank zone, the second one we’ve just done is Project-specific. This means that we can control Retrologue’s Cutoff in this very specific track in this very specific project. Still, it’s the most straight forward way of mapping things, as long as the VST of our choice supports it in our DAW, which is another (sad and strange) story.

Wow, thank you both so much for taking the time to enlighten me. I should have some time tomorrow to try this out. I will report back.

I was under the impression that Quick Controls could only be addressed by a single selected channel. But if I’m understanding this correctly, MIDI remote mapping supersedes those assignments. Which is wonderful news.

I’m relatively new to Cubase after 20+ years in Ableton, and the depth & flexibility of this app is bewildering!

Okay I’ve had some time this morning to try this out and I think I’m starting to get it. Just want to check my understanding/assumptions:

  • Only the first 8 channels in the MixConsole can be addressed in this way.

Edit: actually, it appears that the ===Setup=== item allows this to be expanded to any number of channels. Cool!


  • MixConsole Mappings seem to be tied to geographic mixer positions, rather than to specific channels/VSTs. In other words, if I move a channel around in the mixer, the mapping will not follow. Is that correct?

Quick Controls continue to baffle me. As I understand it, Quick Controls are a set of 8 parameters per track that can be assigned for easy access and control.

When I look at the Right Zone VSTi inspector, it appears to show 8 Quick Control parameters. But when I hover my mouse over ‘Page 1’, I can select from many different pages of ‘Quick Control Layers’.

Meanwhile, over in the track inspector, it seems nothing has been assigned to Quick Controls. Very confusing!

And then when I look in the Remote Mapping Assistant, I see no less than 3 different types of ‘Quick Controls’ to choose from: Focus Quick Controls, Quick Controls for the ‘Selected Track’, and Quick Controls for a specific MixConsole channel.

I suppose the difference in the MixConsole option makes sense: in that case the track does not have to be selected/in focus. I guess my question is: what is the difference between ‘Quick Controls’ and ‘Focus Quick Controls’.

One last point of confusion: VSTi ‘Parameters’ vs ‘Quick Controls’

Looks like the parameters can be expanded via ===Setup=== in the same way as channels in the ‘Mixer Bank Zone’. Are the ‘Parameters’ really just the items from all those pages in the Right Zone VSTi inspector, while the Quick Controls are the 8 items assigned in the track inspector?

Many thanks again, @Joshua_Reiners and @m.c for your time and assistance!

Have a look at this post, perhaps it is of help:

Simplest way for me is to cheat with a third-party app/plugin.

I host the plugins in bidule.
I.E. Host bidule in any VST2/VST3/AU/AAX/CLAP instrument or mixer slot(s) I like. Host any plugins that I’d like to ‘merge together’ into what I’ll call a ‘super instrument’ inside bidule.

Each bidule instance in turn registers hundreds of generic unlinked parameters to the DAW (In Cubase they can become Automation Lanes). I can then link them to whatever I like that is hosted inside any instance of bidule running in the session. Whatever is hosted in bidule can then be automated via DAW VST lanes, via MIDI CC, OSC, whatever…

Yes, it can even link together parameters between Mixer Effect slots and Instruments in the rack. I.E. a bidule instance running in a mixer slot could manipulate parameters of plugins running in a bidule instance in the instrument rack, or vice versa. You could snoop information from the audio streams, MIDI streams, and more, and use that to build up booleen style conditions for automatically applying yet more logic to automate pretty much anything you like running in a bidule instance somewhere (direct VST if it’s all in the same host, but also possible over OSC or Virtual ports if you want to drive bidules running in other hosts, or even on other systems on your LAN).

It can do a good bit more than behave as a plugin chainer. Can also be a stand-alone host. Has built in OSC server/clients. Plenty of real-time MIDI and Audio generation/transformation tools in the box.

I call it my ‘Swiss Army Knife’ plugin. Been using it for years to trouble-shoot and diagnose, sound design, and bolt never had it, and probably never will features onto a number of hosts and DAW scenarios.

Best money I’ve ever spent on what I’d consider a utility plugin. It’s really way more than that (can build full blown synths and samplers, event generators, custom effects, and more); but, I personally use it the most as a kind of super chainer, and data sharing ‘merger/transformer’ app.

Many of the features just now coming to Cubase 14 (modulating paramters with tempo locked LFO patterns and whatnot), been bolting on with bidule since the Cubase 7 days.

Over time, it lends me the ability to have some really interesting and highly portable instrument templates that’ll work more or less universally in whatever host(s) I choose. It can also be treated and used kind of like audio-gridder or VE Pro servers if you have that need.

Another thing I’ve often appreciated about bidule…
Ever had a need to be able to add new plugins while the transport is going without getting a nasty ‘glitch’ in the monitors? I do have some performance scenarios where I need this ability, and as long as I add/remove stuff from inside a bidule instance, I can tweak/add/change plugin chains and crossfade among them all day while the project is playing and not suffer glitches.

As a live host on its own, it’s pretty cool too. Even managed to chain together 16 instances of stuff like Opus or Zenology plugins (neither plugin has native support for PC changes, but with Bidule I can bind a parameter to a list of saved VSTpresets) and mash together a player that conforms to General MIDI protocols (call up the proper instruments with PC events, and drive a shared/parallel reverb and chorus effect chain).

Nice and ‘snoopy’! Need that ASIO sample count? I did to truly ‘sync’ some wave files with Dorico’s transport. Dorico doesn’t have a proper audio track yet, but with a bidule instance in the rack, or on the mains in the mixer, I can lock audio files of any size/length I like so it syncs perfectly with the host based on ASIO sample count. Pretty cool stuff. So, while everyone else is still waiting for a proper audio track for Dorico, and can kind of hack in ONE track using the video player…I’ve managed to lean on a bidule instance to sync up as many audo tracks as I like since Dorico v1. Can also easily bounce staves down to pure-audio and disable processor intensive plugins if I find myself running out of computing resources but still need ‘more staves’ in the score.

I could write a small book on all the improv moments I’ve found bidule to be very helpful. It’s rare I’d hop on a forum like this and plug for a particular product or piece of software. This one is different. I use it that much!

I understand this topic is tagged with MIDI-Remote.

Just in case it isn’t obvious that there is an alternative to using MIDI-Remote for controlling two different synths simulatenously I post this example.

We create a MIDI track and use its MIDI Sends in order to send the same information to up to five destinations. In this case the Cutoff of two instruments were told to listen to MIDI CC 16.
Then I send CC16 to them from the MIDI track.