New to Wavelab after Izotope abandoned Ozone standalone

Hi

New to Wavelab and new to this forum. This would be my first post.

I was using Ozone advanced after izotope got me to upgrade with enticing deals. I was using it for a while and liked it, but then Izotope decided to abandon the standalone mode, which is what I used. I’ve tried running the vst in my DAW, and, just like every other Izotope vst, I get serious visual lag which renders their plugins unusable. I’m angry that they got me to the top step and then pulled the rug from beneath my feet.

However…they have inadvertently done me a favour.

I seen Wavelab with 50% off the price on Cyber Monday 2022, and jumped at it, and I think, potentially, it could be a step up.

I bought a course on groove3, and just can’t concentrate on the content because the tutor has a thick accent, and I find myself too distracted by it.

I’ve basically just mastered tracks in my DAW for the last number of months as I didn’t know how to use Wavelab yet, All the processing is already done, except for adding a little air if the tracks need it.
The only thing I’d like to know for now is how to get all my album tracks at the same volume so that one track isn’t -18 LUFS and the next is -14 LUFS and the volumes are jumping around like that.

I’d like to be able to import 12 tracks into wavelab ( do they absolutely have to go into file groups ?? ), and then manage them in such a way where I can adjust all the volumes, and add a little AirEQ to one or more tracks.

What is the simplest way to go about this ??

Thanks a lot =)

Welcome to WaveLab. iZotope has made some strange decisions lately including removing the standalone Ozone app but as handy as that was, it was never a great place to master an EP or album since you couldn’t really sequence an album or group of songs in the correct order, set the song spacing, add track markers, metadata, etc. and render all your master formats.

Anyway, WaveLab is a great place to do all this.

You could open each song as its own file in the Audio Editor, and all those files can all be in the same File Group. In fact, never use File Groups and have the File Groups bar hidden to provide a little more screen real estate. I don’t use the Audio Editor method for any real work though. I prefer the Audio Montage, even for mastering singles. The Audio Editor is much more of a destructive environment compared to the Audio Montage which is more like a typical DAW session where basic things like fades can be fine tuned and undone.

The thing to know about WaveLab if you’ve never used it is that if you do work on files directly in the Audio Editor, you can only insert plugins in the (global) Master Section which is not automatically saved and loaded when you close and open each file. There are some settings to help but it’s not as automatic as you might expect. In other words, if you load a plugin chain in the Master Section and dial in the plugin settings, if you play another file, it will get the same settings unless special care is taken. That’s why I call it the Global Master Section, and also why I never use the Master Section for any plugin processing. My brain doesn’t get along with it.

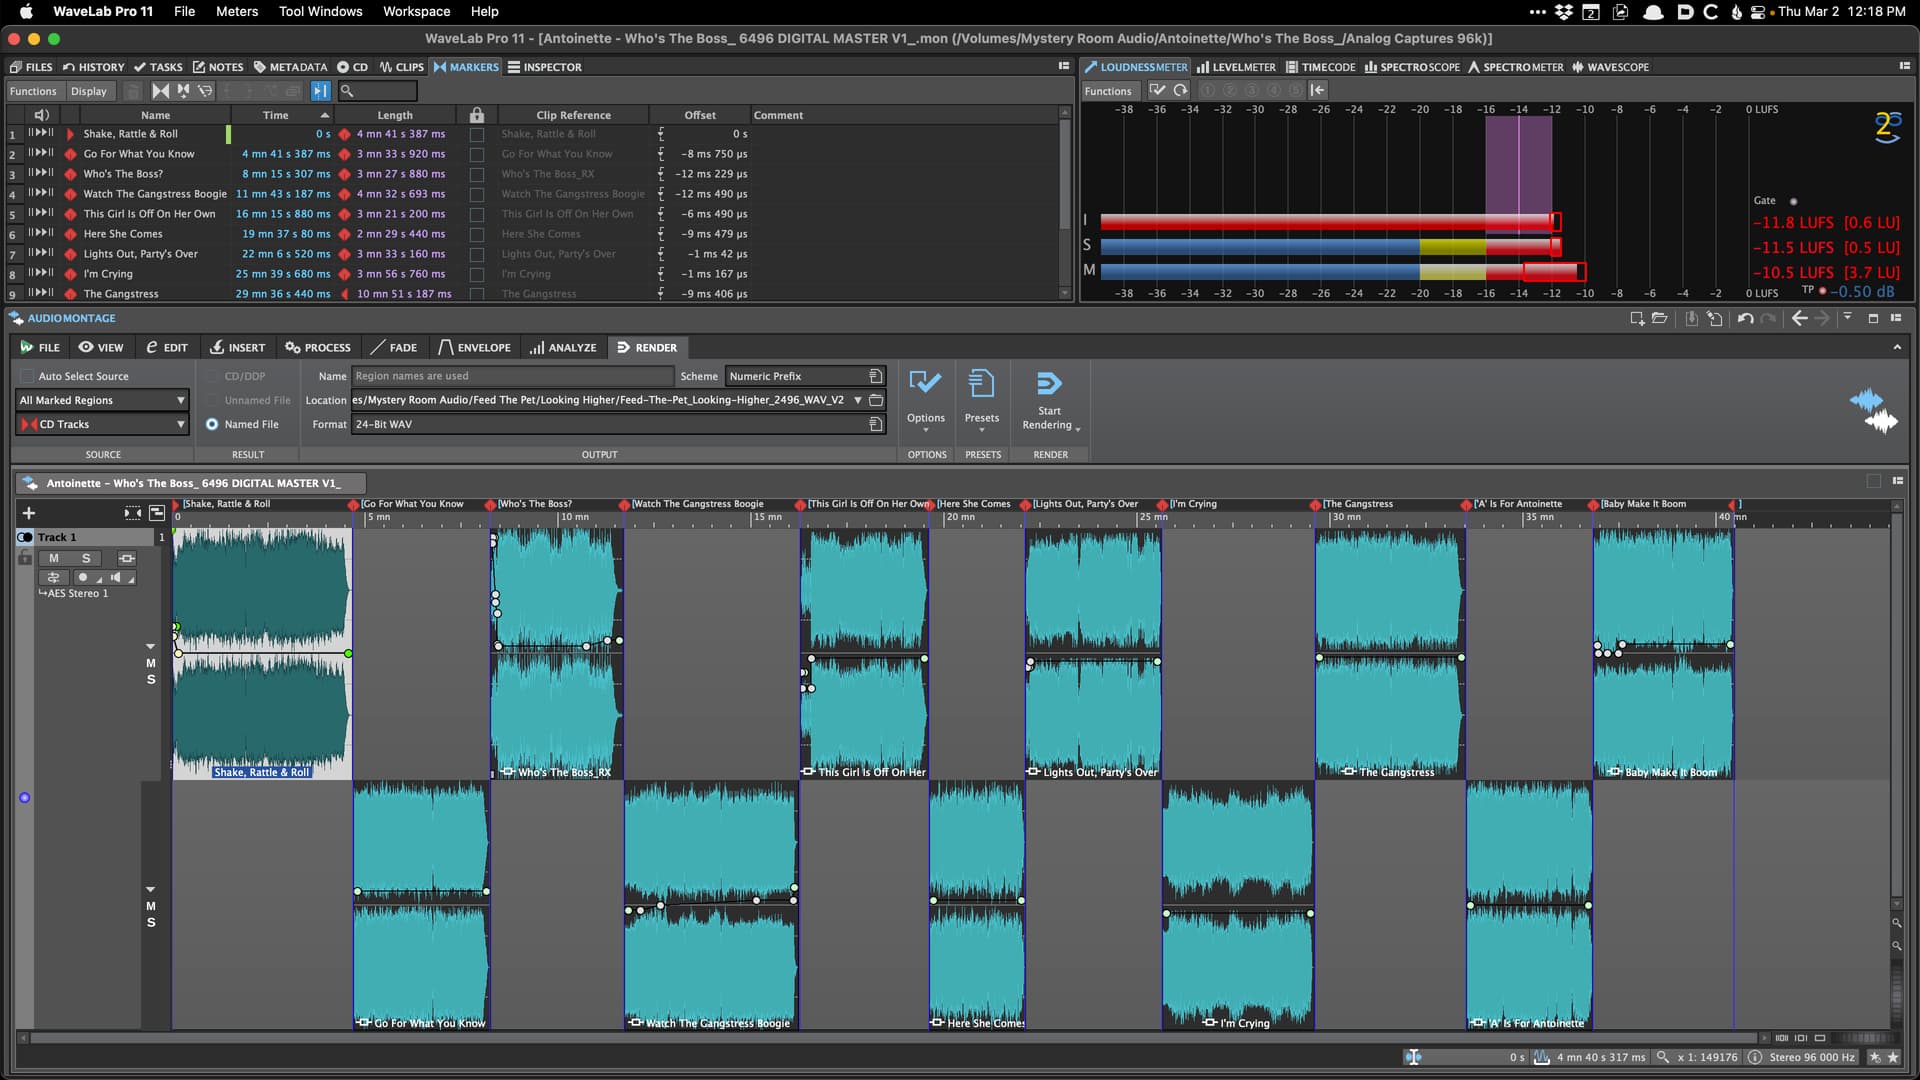
I highly suggest working in the Audio Montage portion of WaveLab. This would allow you to load in all your songs, put them in a certain order, adjust spacing between songs, add track markers to offset the start of each song/track with the first downbeat so there is a short breath (if desired) before each song starts and so the proper song spacing is maintained when you render your master WAVs.

Aside from all that, you can then insert plugins as needed directly on each song using Clip Effects in the Inspector of the Audio Montage, as well as anything you’d like applied globally after the Clip Effects by inserted a plugin or plugins in the Montage Output section.

All of that is safely stored in the .mon file for the Audio Montage as you would expect any normal DAW session to operate.

Using the Audio Editor and Master Section could be considered more direct but it’s also more limiting and confusing in my opinion, plus there is room for user error if you forget to load and save the correct Master Section plugin chain for each song as you go between songs.

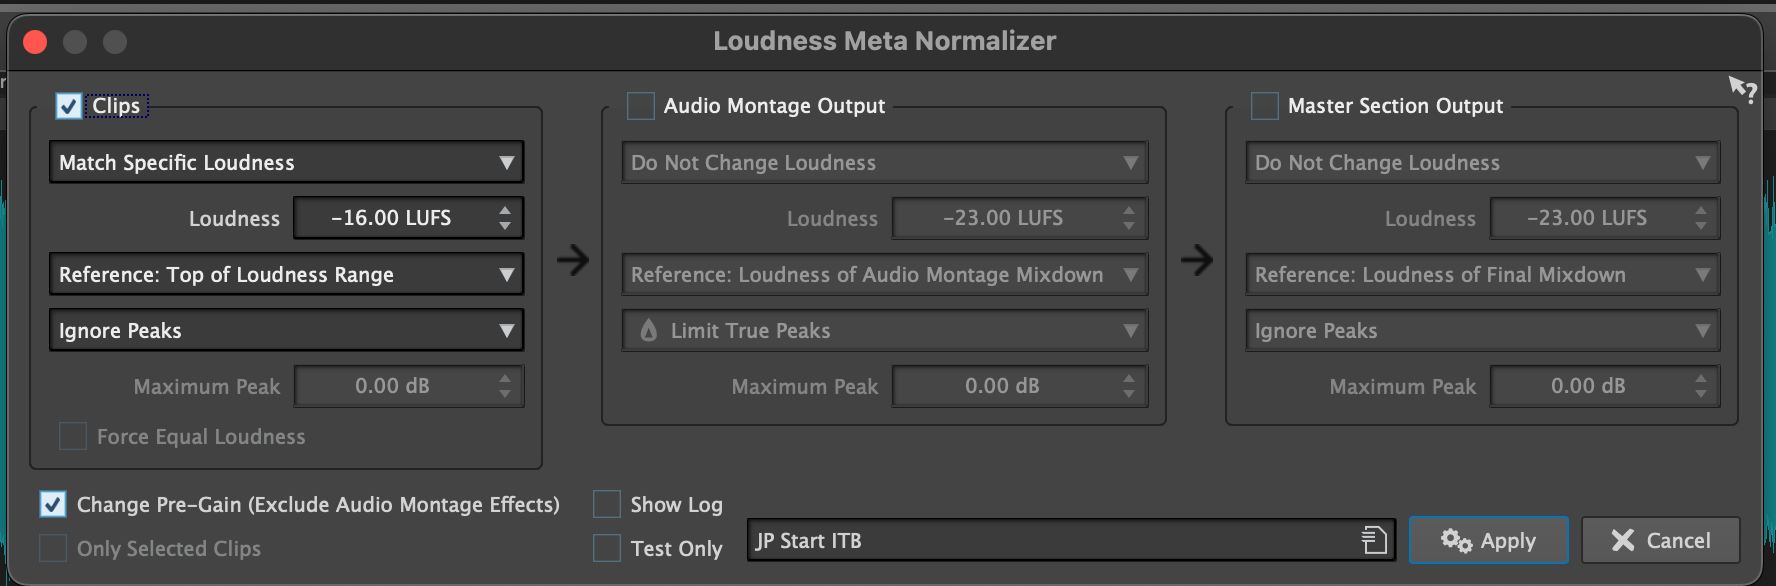
In the Audio Montage, you can even use the great Meta Normalizer option to get all the songs in the Audio Montage to the same mathematical/scientific loudness and then fine tune by ear from there, but with the right settings, the Meta Normalizer can get a group of songs very close to the same perceived loudness. I suggest the “Top Of Loudness Range” option in the Meta Normalizer because that sets the loudest part of each song to the same loudness which to my ear is more musically accurate than Integrated LUFS.

Here is a screen shot of an album I mastered. I already dialed in 95% of the sound using my analog gear and then in this particular audio montage, I did a few per song adjustments using Clip Effects in the Audio Montage, simple level automation, all followed by a final limiter (and eventual dither) in the Montage Output Effects section.

1 Like

Justin answered your direct question, and I have nothing real to add to it.

But…he might be a bit humble to suggest his website, wavelabhelp.com, as a resource for learning. So, I’ll take that one.

He does a YT show for/with Steinberg to go over various workflow things within WL. They will give you a running start. That’s the easiest place to find all the videos in one spot.

I very much owe him a drink or five if we ever meet IRL.

1 Like

I find that most new users fall into the trap of thinking WaveLab is just the Audio Editor and Master Section and more than one new user didn’t think you were able to save your per song settings due to how the Master Section operates :exploding_head:, so I figured I’d get that out of the way by suggesting different and in my opinion easier/better ways to use WaveLab which is the Audio Montage.

1 Like

Many thanks to both of you for the quick responses =)

The main thing that’s confusing me with the audio montage is …do I have to put my 12 tracks on a lane each, or is it just track 1 on top lane, then track 2 on lane beneath, then track 3 on lane 1 again…and so-one until all 12 tracks are on either lane 1 or 2

or

Just for example…is it more a case of track 1 , 4 and 11 on lane 1 because they need a bit of airEQ, tracks 2, 3, and 7 on lane 2 because they need to be compressed, and tracks 5 and 6 on lane 3, and tracks 8, 9 ,10 and 12 on lane 4 because they need a limiter ? I’m assuming clip effects are used on each individual track, and then there are lane effects that affect all tracks along that lane, which are then fed to the master ?

The meta normalizer sounds good but if you apply that to all the tracks, if one is louder than the rest, will that one clip when it’s bringing the rest up to the same volume, or is it more dynamic and knows at what point to stop ?

Hope you can understand what I’m getting at =) Terminology and semantics are what I need to grasp, so I can “get” what wavelab does.

You can put all the songs on a single track with a single lane (see attached).

I just prefer the staggered option on two lanes out of habit, and for more control if any songs need crossfading. You can also put each song on its own Audio Montage Track but I think that’s a pretty inefficient way to work both visually, and CPU-wise if you use Audio Montage Track Effects instead of Clip Effects.

It’s important to clarify if you mean Audio Montage Track, or CD/Album Track when talking about tracks.

You can use Clip Effects to put specific plugins directly on each song (also known as a clip, unless you chop the song up into multiple clips), and you can also put plugins on each Audio Montage track which is not the same as a CD/Album Track. I essentially never use Track Effects. I stick to Clip Effects for any per song needs, and Montage Output Effects for any global needs.

The order of plugins processing in an Audio Montage is: Clip Effects, Montage Track Effects, Montage Output Effects, Master Section (if used).

The Meta Normalizer has a lot of options you should try out. When I’m starting an “In The Box” project I use the attached setting to get all the songs on the same page loudness-wise, fine tune by ear, and then add plugins and processing to reach the desired end result. The level I normalize to is not really in danger of peaks hitting 0dB. It very musically sets each song so the loudest passage is the same and then I fine tune from there if needed.

Sometimes I do that globally using the gain options in the Clips Tab, or sometimes I use the Gain Envelope on the clip to change the entire song or just parts of the song, and then of course plugin processing can also be of use here too.

WaveLab has a somewhat high learning curve but it’s well worth it in my opinion. As @JSMastering mentioned, spending some time with the livestream videos on WaveLabHelp.com could save you some time and confusion in the long run.


This is the most confusing part for me. The only one I understand is the Master. Again, it’s a terminology barrier. I understand clip effects as being vsts used on a per track ( song ) basis, but montage track effects and montage output effects are…new concepts I think, unless its just different words for things I already know. I don’t even know if I’d need these.
At what level is the meta normalizer applied ? Is that on the master, or is it a process that’s applied pre-master ?

The Meta Normalizer changes the level of the clips/songs before any plugins if you use the exact settings I use. To confirm, you’ll see in the Clips Tab something that says Pre and Post with some gain values. Pre Gain is changing the gain before any Clip Effects. Post Gain is changing gain after any Clip Effects. With the settings I use, Meta Normalizer changes the clip gain before any Clip Effects.

Either way, if you’re in the Audio Montage, Clip Effects would be the best place to insert plugins on a per song basis so each song can have its own plugin chain, gain settings, volume automation (if needed), etc.

After that comes Audio Montage Track Effects. I rarely use Audio Montage Track Effects but using them would apply the same processing to ALL the songs and it comes after any Clip Effects and Clip gain settings. In other words, your clips are placed on a TRACK, and the audio is fed from that track into the Track Effects section.

After that comes Montage Output Effects. It’s a good place to put a final limiter, dither or anything that you want applied to all songs equally with the same setting. You don’t have to use it, it’s just an option for one last plugin or plugins after everything else in the Audio Montage.

If you only have one Audio Montage Track, it has a similar effect to Audio Montage Track Effects but if you are using multiple Audio Montage Tracks, it’s where all the tracks sum to so it’s kind of like the “Master Fader” of your Audio Montage session.

After that, you still have the Master Section to insert plugins but you have to be extra careful about managing the plugins in the Master Section because the Master Section is technically not part of the Audio Montage and is not guaranteed to be saved and loaded correctly.

You can also manually control if the volume envelope on each clip is before or after Clip Effects but this all assumes you’re using WaveLab Pro.

If you’re using WaveLab Elements, there will be some limitations to some of the things I mentioned.

yeah I went for wavelab 11 pro. Quite a deal !!

Really appreciate your replies, and I’ll examine it all in more detail ( gonna fireshot the page and save it as a pdf for handy reference when I need it…until I understand it ) , but just one last question.
How good are the stock plugins in Wavelab ? I have things like DMG limitless, UVI Shade, Fabfilter etc…and I’m wondering if, for convenience sake, the stock plugins are high quality. I’ve never owned anything by Steinberg before ( I never see their stuff advertised on places like plugin boutique, audio deluxe etc…) and i’ve amassed quite the arsenal of 3rd party plugins

No problem. There is usually more than one way to do something in WaveLab. I’ve just seen many people come over to WaveLab from other DAWs/apps and be totally confused, so that’s why I sort of accidentally and organically started doing all the livestream videos you can watch. These are just my opinion on the best way to do it, not the only way, or not what might be your favorite way.

I’ve honestly not spent too much time with the stock plugins that come with WaveLab. As a creature of habit, I just use the same trusted plugins I know well. I did have to use the stock plugins a bit when I taught a mastering class briefly using WaveLab and was somewhat impressed with Master Rig and some of the others, but I haven’t taken time to learn them well and incorporate them into my daily work.

Plugins like DMG, FabFilter, Sonnox, Unisum, Goodhertz, Plugin Alliance, iZotope (most of them), Soothe2, Eiosis AirEQ, Softube/Weiss (most of them), UAD, and Leapwing are pretty reliable and bug-free in WaveLab but generally speaking, WaveLab can be a bit more sensitive to 3rd party plugins than the major DAWs and in part, because many plugin developers do not test or officially support their plugins with WaveLab so I always suggest doing some test rendering and usage before introducing a new plugin to your daily work so you don’t find yourself in a situation where you are happy with the sound on playback, but it has a rendering bug and then you have to either work around it or recreate the settings with another plugin.

Just in case Justin’s explanation didn’t make complete sense, here’s how I think about it.

Clip effects only act on that clip, which probably means that they’re per song. If you split a song into multiple clips, then they’re per clip based on how you split them.

The Clips feed into the Track (all lanes within a track), which is where the Track effects are.

The Tracks can be grouped, at which point each Track within a Group feeds the Group, which is where the Group Effects are. (I don’t think I’ve ever used Groups.)

All Groups (or all Tracks if you’re not using Groups) feed into the Montage Output, which is where the Montage Output effects are.

The Montage Output feeds into the Master. The Master Section’s signal flow is downward from the top of the Master Section through to either the Playback Processing (which goes to your monitors) or the Render button.

As a simple example, if you have one song (Clip) in one track in one montage, the signal path is:

Pre-Gain > Clip Effects > Post-Gain > Track Effects > Group Effects > Montage Output Effects > Master Section Effects > Resampling > Master Level > Final Effects/Dithering.

Then, the Render button OR…Playback Processing, which you hear when you’re working…but nothing there ever gets rendered.

Plus some options for exactly where the clip level automation happens.

It is confusing at first. But, it’s also extremely flexible.

What I normally use are Pre-Gain (from the Metanormalizer), then Clip Effects (most of the processing), then Clip Gain (level into the montage output), then Montage Output Effects (usually just album-wide Limiters), then the Master Section (just for meters).

Then, I just flat out stole Justin’s rendering method from one of his videos.

1 Like

yeah the only things I’ll be doing are

  1. Volume matching each track, so they are all a uniform level
  2. Slight EQ to add maybe a tiny bit of high end excitement, or maybe a tiny boost around 100hz or something if it’s needed. Very subtle changes.

If the tracks need anything else, it’s the mix that’s wrong, and I won’t be trying to fix them at the mastering stage. I see wavelab more as a “cherry on top” kinda thing. My DAW is where the DAWnkeywork gets done =)

I’ll definitely be experimenting with the meta normalizer a lot