this question regards the automation lanes in the track editor that you can get if you click on the little down-arrow at the bottom of a track header.
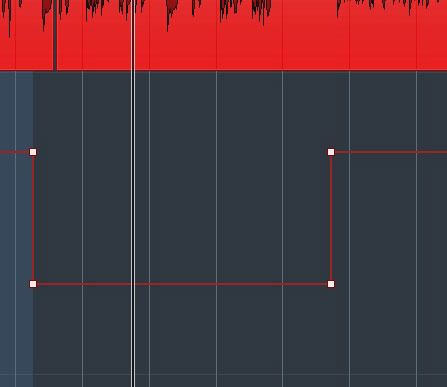
i’m having trouble writing track automation in a way that’s easy and efficient. what i’d like to do is modify an automation curve linearly for a specific span of measures. i want to move the entire span of the curve i’ve selected up or down to change the level (see image below).
notice that the curve is linear ; it’s not bounded by a left point that’s slightly lower than the right, or vice-versa.
in protools, this is easy : just highlight the span, place your cursor over the highlighted curve, and drag the mouse up or down.
in cubase the easiest way i’ve found to do this is :
choose the ‘area selection’ tool
highlight the desired span
drag the mouse upwards within the selected area. this creates two points bounding the selection.
click on two new points on the curve within the selection
drag the inner left point all the way to the top left, then drag the inner right point all the way to the top right
select the two upper points. now you can raise/lower the entire area between the two points by dragging the mouse up or down
this seems like an AWFUL LOT of work to go through to do something so simple !
what is the correct way ?
in fact, i’m not talking about changing controllers for notes. what i’d like to do is modify an automation curve in the track editor. i’d like to raise or lower a specific section of the curve using the easiest method possible, while still keeping intact the relationship between the two bounding points of the section i’m changing. so for example if the curve is for volume automation and the section is bound by two points both at -5db, i want to be able to raise or lower the whole section easily so that when i’m done, both points have a new value but both still have the same db [-10db, 1.5db, whatever].
even after having read the manual section on drawing automation, i can’t seem to figure out how to do such a simple, basic thing without going through a whole song and dance [see above… ].
This tool, I’m talking about, is in the automation track. It’s the same tool, which is in the MIDI Controller line, as you mentioned. I’m still convinced, my solution will work to you.
yes, i see what you’re talking about. at about 2:15 in the video, the demonstrator draws an automation curve, then uses the tools you mention to adjust it.
in fact, this works fine for me too. my problem isn’t adjusting the curve once i have it, it’s obtaining the curve in the first place. you see in the video where the demonstrator draws a wavy automation curve by using the ‘draw’ tool ? and where all of the points are at arbitrary values according to what he’s drawn ? it’s this step i’m not able to carry out when i want specifically 2 points of exactly the same level. then i have to go through the steps i’ve outlined in the first post. once i have those points, then yes, i can adjust them using the scale tool, move-vertically tool, skew tool, or stretch tool. but actually getting those two points at the very first, that’s the problem.
it’s only rarely that i need to draw an arbitrary curve ; usually, i’ll need to vary instrument levels to a constant value for an entire stretch of a song [the chorus, say] or for an entire phrase. but this is such a common thing, i’m sure there must be a way to do it simply in cubase, i just haven’t been able to find it.
I see, I finelly get your point, now (hopefully). THank you for your patience.
Than, there is a simple solution. Don`t use a Pencil tool. Use just a Object Selection tool (without any modifier), and click to the curve, to create a new point. New point will have exactly the same value, as the previous point.
The Automation track has to be in Read or Write mode already.
I think AtaX is talking about the ability to select a range without automation points in it yet, and simply dragging that selection up or down. This is a popular request, in which the automation points are created automatically, and only two moves are required from the user: Select the range, drag up or down.
Cubase comes near what you describe by using the Curve/Line tool to draw a line above or below the current automation line. You have to pay attention to get the line straight though.