is it possible in Halion 6 to record and auto-map a sound of an external source
without using a DAW? As an example, I would like to record an audio signal from a
video or audio player running in the background on my os.
If you only use a native asio driver, then you will be limited to the available inputs of that driver in windows.
there are many soundcards and types available so this is not a one on one answer, but normally cdplayers and media players will work fine.
For windows there also exist combined WDM/MME/ASIO drivers like those from VB-audio.
If you use these everything that comes in to your hardware as an audio signal like f.e. the internet, your small jack micro, skype, etc etc… will also be available for recording in Halion, standalone or directly in cubase.
Since i discovered this latest type of driver, this made access to content quite a bit easier.
You will never look back at something else for input recording. (not for performing/studiowork since you should have a decent audiocard for that)
The asio driver that comes with it is also decent, not fantastic.
and oh yes, they are free but shareware so if you like it, it is nice from you to thank them for their work.
(i’m not connected to this company in any way)
Thanks for your reply and all the information!
But Steinberg advertises Halion 6 as follows:
Record directly into HALion from any internal or external source
and have your samples cut, mapped and ready to play in no
time with the new live-sampling editor.
So, there MUST be a way to do that without additional software.
Could someone from Steinberg please explain the steps to their paying customers, there is no information about it in the manual.
Steinberg advertisement is correct, however, when you want to record sounds coming from the OS mixer you always need some kind of a loopback, either software or hardware. Maybe your UR44 could provide the loopback internally itself (but I’m not sure - please have a look at its manual). If not, then you can always use a physical loopback: cables connecting outputs and inputs of your soundcard.
So how do you do this? I only have master and the internal programs of Halion in my Halion6. How do I get all the inputs from my sound card to show up?
First things first. Does your audio device have native ASIO drivers? If so it’s generally best to use these native drivers, and you should find in the audio settings of HALion a place to choose the inputs.
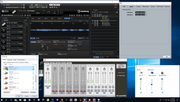
In this example I have quite a few ASIO compatible drivers on the system. For this session I’ll be using my Tascam 1200 USB audio interface, which includes 6 audio inputs.
The inputs show up right away in the “Inputs” tab of HALion’s “Plug-in Preferences” dialog. Inputs 1 and 2 on this rig have mic-preamps, and I happen to have a stereo bottle mic’s L&R XLR cables connected to them.
If your audio device does not have native ASIO drivers (common when using the audio built in to the motherboard), then you will need to use an ASIO bridge driver such as the Generic WDM>ASIO driver/bridge that ships with Steinberg products.
Steinberg Hosts only use the low latency ASIO protocol. If you use hardware that does not have proper ASIO drivers, then a bridge driver is needed to convert one of the protocols supported by your hardware into ASIO. Steinberg hosts ship with such a driver/bridge.
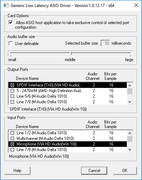
This driver is called “Generic Low Latency ASIO Driver”. In most cases this driver gets installed by default with pretty much any Steinberg Host you might install on your system (the user can chose NOT to install it, but it usually gets installed by default). If you suspect it is missing on your system, run your HALion installer again to check. If it’s missing, or a different version, then your HALion installer should let you know, and provide options to install it.
If you are using “Generic Low Latency ASIO Driver”, then you’ll need to tell it about inputs before they will be accessible in HALion’s stand alone mode.
It is a good idea to set up these drivers before you launch HALion or any other software that uses the Generic ASIO Driver. It might also be a good idea to close any running apps that are using the audio device.
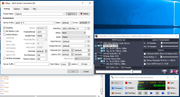
To get to the driver’s setup app shown in the screenshot above:
tap your windows key.
type: asio
launch from the search list: “ASIO Generic Lower Latency Driver Setup”.
Activate all inputs and outputs you want to be accessible in your ASIO host software.
Next time you launch HALion in stand alone mode and choose the Generic ASIO driver, you should now find the audio inputs can be selected under the audio settings.
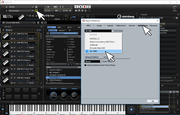
In the top left corner of HALion There is a MIDI port icon, and under that is a speaker icon. To the right of the speaker icon find the gear/setup icon and click that.
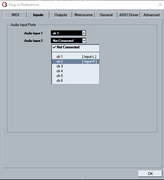
Click the inputs tab.
Chose the input(s) you want using the drop down selectors. If there are no inputs present to select from, check your ASIO Driver tab. Make sure you’re picking the proper driver and that the driver is set to recognize your hardware inputs.
Notes:
I’ve had some cases over the years where the Generic ASIO driver did not pick up everything on my system when running the Setup App. In such cases I found the following solutions.
Reboot the system before running the setup. The problem was that something had taken exclusive control of the inputs I wished to activate and the setup app could not list them. Rebooting the system helped insure the inputs/outputs were not in use at the time I ran the setup app.
Temporarily disable or redirect Windows’ default audio inputs and outputs then try relaunching the Generic ASIO driver setup app. If the desired input/output still refuses to list, try rebooting and relaunching the ASIO setup app. Again, insuring devices were not in use before launching the app made it possible for the setup app to find and list more devices. In such cases where I’ve had to redirect Windows’ defaults to free up a device, I could then re-establish them after saving the ASIO setup settings.
There have been cases where I simply had better performance and more flexibility using a different WDM>ASIO bridge/driver. ASIO4ALL is a very common, free, secure, and stable solution. It includes a UI that is accessible through the system tray when the driver is active.
One major advantage to having this driver installed on your system is that it makes it possible to aggregate multiple audio devices for use in a single host. Steinberg’s own Generic ASIO driver can aggregate to some degree, but I do not find it to be nearly as flexible, nor comprehensive in the number of devices out there it recognizes and supports. ASIO4ALL is pretty much a must-have staple driver for any Windows user who wishes to mix and match a variety of audio interfaces on the same system, under a single work-session. It is very small, and easy to ‘uninstall’ if it happens to get in the way, and reinstall when it’s needed again, so I highly advise keeping a copy of the latest installer handy.
These can come in handy if you want to connect the audio streams of various pieces of software to one another.
I.E. Connect the output of your web browser/flash playing a youtube video to the input of HALion.
There are a number of commercial or shareware products out there such as the VB-Audio line mentioned earlier in this thread.
There is also a good free one called Jack2, which is what I personally use (generally in combination with ASIO4ALL). If the apps you wish to sample from happen to support ASIO drivers directly, then you can use this without an extra virtual cable driver. It’s as simple as using “JackRouter” as the audio output, and then routing audio between the apps with the Jack control panel.
For apps that will only work through the Windows Direct Sound Mixer, you’ll need something like VB-Cable, or a real patch cord as well.
I wanted to make some samples directly from YouTube into HALion.
Devices with a Monitor Mix Output
Normally I’d just use my m-audio Delta 1010 audio device since it has full ASIO support and a mixed monitor feed built in. The Delta provides a set of monitor inputs in HALion, and subsequently everything from the the Delta’s mixer gets mixed down and sent to these ports.
So, I can route the Default windows output to any of my Delta 1010 software returns (In this case Windows WDM drivers) and the signal shows up in the mixer accordingly. I then route the Delta’s mixer into HALion.
So if your audio device provides such a monitor connection, simply use that. Note that the methods to activate and use a device’s Monitoring features can vary from model to model. Most will have some sort of control panel that runs in the System Tray, while some might even have you do it through the Advanced tab of HALion itself.
Devices without Monitoring Features
My other audio devices do not provide such a monitor connection in the sound matrix. For these devices, Here’s how I pulled it off:
Install ASIO4ALL. I use this to aggregate multiple devices into a single ASIO compliant driver.
Install VB-Cable. This creates a virtual cable by way of a WDM device driver. On my particular system I needed to locate the control panel after installing this and set the buffer size to at least 1024 or it just wouldn’t work (got pops and garbled audio until the buffer was large enough). The panel in question is located at “%SYSTEMDRIVE%\Program Files\VB\CABLE\VBCABLE_ControlPanel.exe”.
Note that if your audio seems dead after first installing this do not panic. You just need to reset your default Windows Audio Drivers as you had them before. Just tap the windows key, type "sound’, launch the “Sound” control panel, and set your defaults back as you like them.
Install Jack2. I use this to route audio from the VB-Cable driver into HALion, and simultaneously to some audio outputs for monitoring. It’s perfect for the job since it is simple, ASIO compliant, and gets detected by Steinberg Hosts.
Using its control panel, set up Jackd2 so it will use ASIO4ALL as its audio driver at the sample and bit rates desired, with buffer sizes appropriate for your system.
Start the jackd server using its control panel.
Configure ASIO4ALL so that it aggregates everything you need from the Audio device you will be using with the VB-CABLE driver. In my case I want to be able to easily switch between sampling into HALion from the stuff plugged into my TASCAM US1200 USB interface, and anything playing through Windows itself; so, I’ve enabled the entire TASCAM in ASIO4ALL. Since do not need the outputs from VB-CABLE in this session I’ve disabled those. Everything else I’ve got connected to my computer, but will not be using I have disabled in ASIO4ALL.
Click “Connect” in the JACK Control Panel. Route the outputs of VB-Cable to your main system outputs. This will allow you to monitor whatever you have connected to the VB-Cable driver.
The order of Capture Devices will be the same as they are listed in ASIO4ALL. Example: My Tascam has 6 inputs and 2 outputs active. VB-CABLE has 8 inputs active; So, I know the VB-CABLE inputs are 7-14 respectively. I just went ahead and hooked them all up real quick.
If you want audio from a sound that has options to choose the audio driver, then you can simply set the app to use VB-CABLE. This is pretty common for most dedicated audio apps. If the app happens to support ASIO devices, this is even better, as you can skip VB-Cable and route directly into JackRouter!
If the app you wish to record from doesn’t have a method to choose the audio device (I.E. Flash Player from inside a web-browser), sometimes you can right click the speaker icon in your system tray, open sound settings, then click "Other sound options’ to direct individual streams to the VB-Cable. If that does not work…
Set VB-Cable to be the default audio device for Windows. To do this tap the windows key and type the keyword: sound, then launch the Windows “Sound” control panel. Right Click “CABLE input” and set it as the default device. Right click it again and set it as the default communications device.
Now that you have audio routed from the app, or from windows itself into the Jack Router you can start HALion.
In HALion’s Plug-in Preferences choose JackRouter as the ASIO Driver.
Set the HALion Outputs to use your desired Jack outputs.
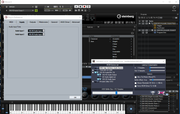
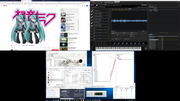
Set the HALion Inputs to use the relevant Jack capture routing. In my case here (sampling from Youtube into HALion) it’s using ports 7 and 8.
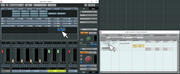
Alas, I can sample from Youtube running in FireFox Browser as seen here!
Yes, all that mess in the screen shot can be hidden and tucked away neatly…I’ve just spread it all out so give an idea of how it’s set up. Things will vary depending on the kit you have plugged in!
Hi, Brian and thank you for your long explanation. I am using RME802. But I did not expect anybody to use the standalone version of Halion6. I have only been using the VST from within Cubase. Using the standalone I get all inputs to appear as they should and it works right away, but in the VST no inputs show up at alla.
Now I have found a solution to sampling within the Halion6 VST as well. I am not sure anybody have posted this anywhere, and it was not clear to me when reading the manual. But here we go. If I start up the Halion6 VST and use the little button on top to activate “side-chain” and then create an audio track for my input from a mic or synth I can route that track using output to side chain and select Halion6. That works, but it is a cumbersome Solution. Is it supposed to be this way?
Oops, I took the ‘without a DAW’ to mean it was in stand alone. Yes, side-chain is the way to get things into HALion from inside a DAW. If you have a DAW that allows it, sometimes it can be a little easier and more flexible to run HALion in the effect slot of a ‘group bus’ set to quad or surround sound instead of as a VSTi. I sometimes wonder why HALion doesn’t ship with a VST effect slot variant of the plugin as well…
Since I use Cubase most of the time, I rarely sample directly into HALion anyway. HALion and Cubase pretty much meld into a common instrument that’s easy to drag and drop information between. However, I understand there are times when it does make sense to sample directly into HALion…particularly for making short wavetables.
For a DAW that cannot do the side-chain thing at all, which also prohibits running a VSTi in a quad/surround group (or doesn’t have group buses at all), I’d personally use Bidule and run HALion inside Bidule from a VST Mixer effect slot on an Aux Send channel instead of as a VSTi. Bidule gives me the tools I’d need to wire up different audio streams to the input pins of HALion, and having it on an Aux Send bus makes it easier to route different signal in there.
A trick I often use for major sound design projects in CuBase (should work in any DAW with instant render, and drag and drop support) is to host HALion on a dedicated ‘instrument track’. That makes it pretty simple to arm/monitor/mute/solo/etc. and route from one spot. I’ll keep ‘song data’ off the track.
For the task of ‘re sampling’ an entire VSTi plugin or something…
In a dedicated CuBase project, I’ll make a sampling template in the MIDI editor of the instrument track that automates the process of playing each note I want to sample at different precise velocities, with a few seconds between each to allow for things like release times and tail samples.
Next, I’ll instant render the track. It gets rendered into a pure audio track, which is then easy to slice, dice, polish with fully rendered effects, and touch edit into nondestructive events/parts on the tracks/lanes with the DAW before moving (drag and drop right onto a zone map, exactly where I want it) into HALion. I still have my MIDI part(s) on the HALion instrument track as reference points for quickly locking cursor points and such.
For some things, I’d rather work with the DAW sample editor anyway. I can buff and polish the samples a bit before I bring them into a Sampler for looping, cross-fading, and other micro-level edits of that nature.
Once I’ve got my rendered track edited, sliced, and diced, I drag it directly on the zone map where it belongs in HALion, set up loops and cross-fades, and it’s pretty much done other than fine tuning db levels (if necessary), which I’d wait until I’ve got all the samples in the instrument to do anyway.
Until I force otherwise (by exporting the samples, or running some kind of destructive/frozen edit inside HALion), technically the source of all the samples in HALion is still in one long audio file, and there’s no doubt that it’s located in the Project’s audio folder. HALion has features to automatically slice it into multiple samples, process, pack, tag, and rename things when it comes time to either export the sound as a preset with raw samples, or pack it into a vstsound library.
For some reason, the standard inputs don’t provide AUX sends.
A simple fix is to register the inputs as an ‘external instrument’, instead of assigning it as a an ‘input’. The advantage in doing this is that you can then route this into any anything you like using an AUX Send. The only disadvantage I can think of is that you’ll have to load the inputs from the Instrument Rack (they won’t pop up by default in fresh projects as ‘red’ slider on the Mixing console).
Tap F4 to bring up “Studio/Audio Connections…”.
Disconnect, or remove the desired inputs from the “Inputs Tab”.
In the “External Instruments” tab, Add a New External Instrument and name it whatever you like. It’s OK if you’ll be using mics, or a set of them instead of an ‘instrument’. Just do it, and name it accordingly. Unless you have a very good reason to do otherwise and understand how it effects the “MIDI Device Manager”, do NOT link it to a MIDI Device.
Once you’ve assigned the inputs to an “External Instrument”, you should find your new “Instrument” listed in the Cubase Instrument Rack (F11) under the group “External Plug-ins”. Add it the project. Your new instrument should get a track and show up on the Mixer as an Instrument with a ‘bright green’ fader.
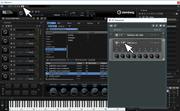
Activate Side Chaining in H6.
Now you can easily route anything into HALion from this instrument using an AUX Send.
Here is an example showing how I’ve done this with my Roland Fantom XR unit which is plugged into my Delta 1010 inputs 1 and 2. Note, all I did was hook an AUX send to the HALion Side-chain bus. I set it to be ‘pre fader’. Now whatever comes through my Fantom gets directed into HALion.
You can use this technique for microphones as well…or even set up generic names that correlate to the inputs on your Audio Interface.
The reason you must route any inputs ‘through the host’ is due to the ASIO protocol and standards. Plugins are not EVER supposed to access an audio device directly, as it can totally mess up timing synchronization in least, and cause buffer overruns and system crashes at the worst. I’ve only come across a few plugins that try to do this. They are hard to find, highly experimental, and tend to be very unstable (to the point that they can create such a noise they’ll blow speakers, and possibly damage your hearing).
If the host/DAW does not have a way to get the audio and route it into HALion, then you’re out of luck. This will be the case for any sampling instrument that adheres to ASIO protocol (I.E. Kontakt, Mach 5, etc.).
For a long time it was not possible to get audio ‘into’ a VSTi plugin at all. It could only be done with VST ‘effect’ plugins that were designed to go in an effect slot. Side-Chaining effect plugins was awkward as well, often requiring hacks like using a quad group bus and alternate routings.
VST3 protocol changes this, as VSTi instruments can have ‘inputs’ and support side-chaining. While it’s possible to make a VST2.4 ‘instrument’ plugin with inputs (The VST2.4 variant of HALion does have them), it’s not very common, as most hosts from that era would just ignore them if it knows it is an ‘instrument’ type rather than an ‘effect’ type plugin anyway.
Not all DAWs out there can do VST3 yet though. Not all of them support side-chaining like Cubase does, particularly for ‘instrument plugins’. Their workaround is that they ‘might’ allow you to host a VSTi in the effect slot of a group bus instead of providing methods to set up and route special ‘side chain’ buses. Some DAWs might pretty much do it that way out of the box anyway, and host instruments and VSTi plugins identically. Hosting something like HALion in such a group would provide a means to get audio into something like HALion.
For a DAW that doesn’t support Side Chaining, and also will not let you run a VSTi in an effect slot…you’re either out of luck, or must rely on some third party chainer that can fudge a VSTi into a regular VST effect slot (such as Bidule).
Ok, this explains why the standalone version does this easier than the VST do in Cubase9. That you for all your long explanations. I have managed to get it done with audiotrack and sidechain. Wish the manual was a little better to explain stuff like this.