What is it used for? I have seen that multiple audio interfaces can be used with it, like ASIO4ALL?
Can this be used to record in Cubase successfully?
What is it used for? I have seen that multiple audio interfaces can be used with it, like ASIO4ALL?
Can this be used to record in Cubase successfully?
Its main purpose is to make it possible to use interfaces that don’t have native ASIO support
Only one device can be selected as output and input at a time.
If required, it is possible to select a different device for the output than for the input. However, it is recommended to use a single device only.
Yes.
All answers, except Yes, are quotes from the page that you linked to.
My query was because I had seen mentioned that this Steinberg ASIO driver was better than ASIO4ALL. So I assumed it might operate the same way, i.e., as a virtual driver that allows access to all ASIO interfaces together, but without the latency timing issues. Wishful thinking, I guess.
The driver that is best is the one that comes with the interface. Using multiple interfaces with asio4all is the only viable way. Not something I would do though. If I needed more I would choose an interface combination that could achieve it and stick with the manufacturers driver.
When it comes to drivers for devices that don’t ship with their own ASIO driver, it’s best to try things and run your own tests.
Everyone’s system is different. Mine runs both ASIO4ALL or the Steinberg bridge quite well the few times I’ve needed it. ASIO4ALL provides a few more features (more user tweak ability, possible to aggregate more than one device/etc) than the Steinberg WDM<>ASIO bridge.
Other people with different systems have different experiences…some can’t use ASIO4ALL at all, and find the Steinberg driver is fine. Some have the opposite experience. Some find little or no difference ‘performance’ wise in either option. Some can’t get either one to work well.
End of the day…it’s harmless, and easy to try them both (as well as other options), and go with what works best for you. You can even have both installed and decide which one to connect your host(s) to use. With some audio devices it might even be possible to use them both at the SAME TIME (with different hosts). Windows PCs are strange beasts with seemingly infinite possibilities (both bad and good) on the system configuration.
Generally, it’s better to have a nice ‘professional grade’ ASIO native audio device (comes with its own ASIO drivers…optimized for the device, nice preamps, digital in/out, more complete mixing/monitoring/routing/etc), but of course there are times when you just want to carry on with a laptop or something, and use the built in audio. Get a nice interface if you’re on a desktop!
If some kind of portable solution is in demand for you (laptop/tablet) and it doesn’t come with ASIO suport, try both and compare ![]()
There are other options too. Stuff like FlexAudio, ASIO2WASAPI, and more.
ASIO4ALL Alternatives and Similar Software | AlternativeTo
Also, if you’re on Windows, and want some serious ‘low latency routing and networking’ capabilities, and the ability to route audio streams between ASIO hosts and WDM hosts, have a look at ASIO Link Pro. It’s free these days, and an amazing piece of software (needs an ASIO device, or a bridge driver like those discussed above). It might not work for everyone, but giving it a try is harmless.
ASIO Link Pro Tool Saga (give.academy)
Thanks Brian.
I understand that one issue with using different interfaces via ASIO4ALL is that the latencies can vary between the two interfaces, causing timing issues. I have to wonder if the alternatives are any better.
Here is an example…

This can be true. It depends on how you intend to aggregate them, and if they have a way send/receive an alternate clock signal.
Example 1:
Use one audio device for outputs and inputs, and a second audio device for INPUTS ONLY.
In fact, it’s pretty common for people to use ASIO4ALL specifically to aggregate something like a USB mic into their DAW setup.
In this case clock drift shouldn’t matter. Using ASIO4ALL to aggregate the two devices shouldn’t be a problem at all…assuming your system can run them at latencies low enough to suit your demands.
You can still use the outputs from both devices, but keep in mind that they could drift out of sync over time. The longer a song, the more drift can happen over the duration of that song.
Sometimes clock drift doesn’t matter much, if at all. I.E. Using a set of USB only headphones or a phones/mic headset combo. Sending a signal to a totally different room, where no one is actually trying to ‘perform in real time’ with the project. Simple pod casts mixes and such that a little clock drift won’t be noticed.
Example 2:
If your devices feature using an external clock such as: Word Clock, SPDIF, ADAT, or something similar (some can even sync over a PCI/e lane)…
In this scenario, you could use ASIO4ALL to aggregate just about any devices you like.
Typically you’d use a cable of some kind to connect the two devices together. Decide which device is master, and which is slave. Connect the clock of Master OUT (SPDIF/Word-Clock/Whatever) to the corresponding IN port on the slave device. Designate in the slave’s driver panel to use the same clock as the Master device.
In this scenario, you should also be able to aggregate the two devices and use ALL of the outputs without them getting out of sync.
Example 3:
Some audio devices ship with very complete native ASIO drivers that allow cards from the same (or compatible) brand/family/chipset to use the same driver, and get them to sync properly. A few of the PCI/PCIe cards out there can share a clock over a PCI lane (no special cable necessary), some might come with a little internal bridge cable (kinda like what you get for stuff like SLI/Crossfire on video cards), but most of them (usb/firewire/thunderbolt platforms in particular) still require some kind of digital connection via external cable, and settings in the driver to designate which clock to use.
Personally, I have several older PCI based m-audio Delta 1010 devices. I use a PCI to PCIe bridge to get them connected to my more modern PCIe only mother board. I daisy chain them together with word-clock or SPDIF cables. I open the m-audio driver control panel, and set the last unit in the chain to be master (use internal clock), and all the others to be slaves (use external word-clock or SPDIF).
Example 4:
The higher end your device is, the more likely it is that it can support standards like ADAT, AES/EBU, and more for expanding output/input capabilities.
Many mid-range USB/Firewire/Thunderbolt based devices these days at least feature a simple set of ADAT ports, thus making it possible to at least ‘double’ the original number of inputs/outputs. As for the port expansion options that you’d plug into that ADAT port…your possibilities could be quite numerous. You’d shop around for the features and quality that you demand.
If you don’t need really long cable runs, the ability to swap among different fancy and very expensive independent A/D converters and such as that…a device with an ADAT port or two should be plenty. If you need to make really long cable runs, want to use external A/D, and/or just need a boat load of inputs/outputs (more than 16 x 16), then consider the higher end AES/EBU devices that are up to broadcast standards.
AES/EBU devices tend to allow your choice of the same ‘protocols’ we’ve been discussing (SPDIF/ADAT/wordclock/etc), but can do it over XLR (but the impedance rating is important, so it might not be just any ole ‘xlr mic cable’ from the shelf) style cables (and some feature even more/newer cabling options), and your cables can be MUCH longer. People who have a nice digital mixing console for their ‘live band’, might also find it worthwhile to invest a little extra in broadcast quality AES/EBU for the PC…for obvious reasons.
Example 5:
LAN/WAN networking options. Platforms and options do exist to do audio via various networking protocols. At the base consumer level, it is practical and FREE to experiment with stuff like ASIO Link Pro, and reaStream (and several more free options exist that I’ve never read a thing about other than seeing they exist). You could aggregate devices from a totally different machine! I.E. Chain your Laptop to your Desktop via ethernet cable, and share their audio devices. It might even be possible to get a clock signal by routing some SPDIF ports over the LAN (haven’t tried it, but it might work).
Networking options can definitely be hit or miss. It’s easy enough to share a stereo connection or two from time to time, but for serious multi-channel networking solutions, you’ll need to know what you’re doing (or be OK with learning the ins and outs). Be prepared to educate yourself on optimizing networks for audio streams (It’ll be quite different from what you want for the internet, so a second network card in each machine set up for multichannel audio streaming is a good idea. If you’re connecting several machines, a different hub/router optimized for streaming audio might help as well).
Realize that some ethernet chipsets/drivers are going to be absolute garbage for low/no latency A/V streaming because they might try to dominate the same CPU core/s your DAW wants to use (or some other mind boggling/hair pulling issues to sort out).
Personally, I have used ASIO Link Pro to get machines sharing audio over a regular bog standard ethernet setup (optimized for the internet) at long distances. It has come in handy for sure, but I have NOT tried to do this in any kind of situation where super low latency and rock solid synchronization is paramount.
Good stuff, Brian. Thanks.
I hadn’t thought about the word clock or digital clocking connections. Of course, the UR44 doesn’t have those, so I can’t experiment with that along with my Evo 16.
I have an old MOTU 896 that connects to the computer via Firewire. I might try getting that out and adding a Firewire card to my computer, and see how it might work with the Evo 16, IF I can get drivers for it to work on Windows 10. But I doubt that will be any time soon.
As an aside, when I tried to use ASIO4ALL, Cubase (and a VSTi) wasn’t accepting MIDI input from my keyboard. But when I switched the driver to my UR44, the note messages I had played all came in and played. That was pretty strange.
Interesting…ASIO4ALL shouldn’t affect the MIDI side of things at all. Maybe something just wasn’t connected properly, or set up right in your host (Cubase?).
Do make sure if your PC has more than one audio device to have them all using the same sample rate and bit width. I.E. 44.1k @ 24bit if you like to work at CD quality (I use this clock because I have some older SPDIF gear connected that won’t work at any other clocking).
48khz at 24bit is more common now, pretty much the ‘streaming standard’ for video and the internet. (Thoe many will ultimately make a dithered 16bit Master for distribution, to save streaming bandwidth).
So if you can, just leave the bit width at 24bits on all your audio devices. Cubase works at 64bit precision internally…
You can go much higher on the sample rate with alot of devices these days, but is it worth it? Unless you have REALLY nice mics/preamps and stuff at hand, or just like the way the A/D conversion sounds better on your system at the higher rates (sometimes it sounds noticeably better merely because the voltage jumps up a bit in some of the chips at the higher clock rates…and the difference in the sound actually has nothing to do with the higher sampling rate itself), so it’s probably not worth it to go over 48khz for most home studios (that slightly better sound quality through your own gear, probably isn’t going to translate over to the the people you share your Master with anyway), but do run your own experiments ![]()
For some kinds of music, with the right combinations of gear, the extra head-room of higher sample/bit rates might be worth it, but I think it’s pretty rare to need it with most street level gear (the mics and preamps aren’t really good enough to take advantage of the extra dynamic range and sample resolution anyway…and maybe only 0.1% of the world will notice a difference, and then…only if they A/B roll it back to back and compare).
For what it’s worth, the higher your sample and bit rates, the larger your audio files will be.
Don’t forget that once you connect a new audio device in Cubase for the first time, that you’ll need to (tap F4 if you have Cubase Pro. I’m not sure where it is if you have Artist/SE/LE) and configure your inputs/outputs as you like them. I believe at the point it tries to remember the last settings for a given audio device. If you change something later in ASIO4ALL itself later, such as aggregating in a new device, you might need to re-establish some things back in Cubase afterward.
ASIO4ALL has a lot of flags and options to tweak about and try. Ultimately you can get very fine/precision control over the buffer sizes and a few other things. Too small and you’ll get glitches, or it might even freeze up and not make sound. Too high, and you’ll get crazy latency.
Most computers out there should be fine to start out with a 512k buffer using the simple mode controls. Should be well under 20ms latency, which is quite tolerable for most situations. Start stacking up plugins, and getting glitches? Increase the buffer size in 32k increments until it’s running smooth again.
You’ll have to click into the advanced options to get at most of them, and most certainly to aggregate different devices.
Latency mostly matters when you’re trying to play along in real time with tracks, or trying to mix in real time with something like a MIDI Controller fader. If you mostly poke and punch your stuff in using the mouse/keyboard or do ‘step mode’ entry, latency might not matter as much. You can have HUGE 4mb ASIO buffers if that’s what it takes to keep your plugins sounding good.
When you get ready to mix stuff in real time with a controller, or by dragging faders in your DAW Mixer (as opposed to using visual cues and drawing it into VST Lanes with pencil tools)…render your VSTi stuff down to audio tracks to take back the CPU power those VSTi plugins were eating up, and drop your ASIO buffer back as small as you can.
Start with the latest/newest version of ASIO4ALL you can find. If it’s not working you might try rolling back a version or two older before giving up.
Oh, I almost forgot to mention a method to aggregate devices that ‘should’ work pretty well for some systems/situations.
If ASIO4ALL doesn’t cut it for you…you might have luck running Two Instances of ASIO Link Pro.
Have each of your audio devices use their own proper ASIO drivers to hook up to his own unique instance of ASIO Link Pro on the same machine.
Consider the device that your Main speakers/headphones are hooked to as the master device, and all the rest as slaves.
Use the networking abilities of ASIO Link Pro to route audio between the Master and slave devices.
You’ll have Cubase use the ASIO Link Pro instance that you consider to be the Master directly.
You’ll do the networking between your two ASIO Link Pro instances over localhost [127.0.0.1] (so the tcp/ip stuff happens at OS level, and doesn’t actually go out to your LAN/WAN).
Use the loopback rails in your ASIO Link Pro instances to get audio routed into and out of Cubase accordingly.
ASIO Link Pro should have enough jitter control correction and what not to at least get some extra inputs from a second device working.
Again, if clock drift matters and is noticeable for your situation…avoid using slave for ‘outputs’ for those situations. Inputs should be fine (or easily correctable in the DAW if a bit off).
Tips on ASIO Link Pro…
It can be rather confusing how it works at first! Documentation does come with it, but it’s kind of hidden in the installation folder “Program Files (x86)/ASIOLinkPro”, so look for it and study ![]()
Activate the LOOPER loop back rack.
When you start ASIO, It’ll put a Master instance in your system Tray called, “asiolinktool.exe”.
The FIRST thing I want to do after connecting this to my M-AUDIO setup is “Enable multi-clients”.
This first/main instance is where you route OUTPUT to your audio device.
The first inputs and outputs are relative to your audio device.
I.E. My M-Audio Delta 1010 setup has 24 inputs (Including Monitoring and SPDIF Channels). So the first 24 ASIO HOST IN MIX pins correspond to these in order. Everything channel 25 and up, I can use for routing whatever I want!
My setup has 20 outputs, so the first 20 channels go with my audio device. Anything from 21 and up, I can use for whatever I like.
In this main instance I can connect Inputs from my audio device, or from the special WDM bridge drivers straight to outputs of my audio device, or to the network. But what about routing stuff from my apps?
This is where LOOPER rack comes into play.
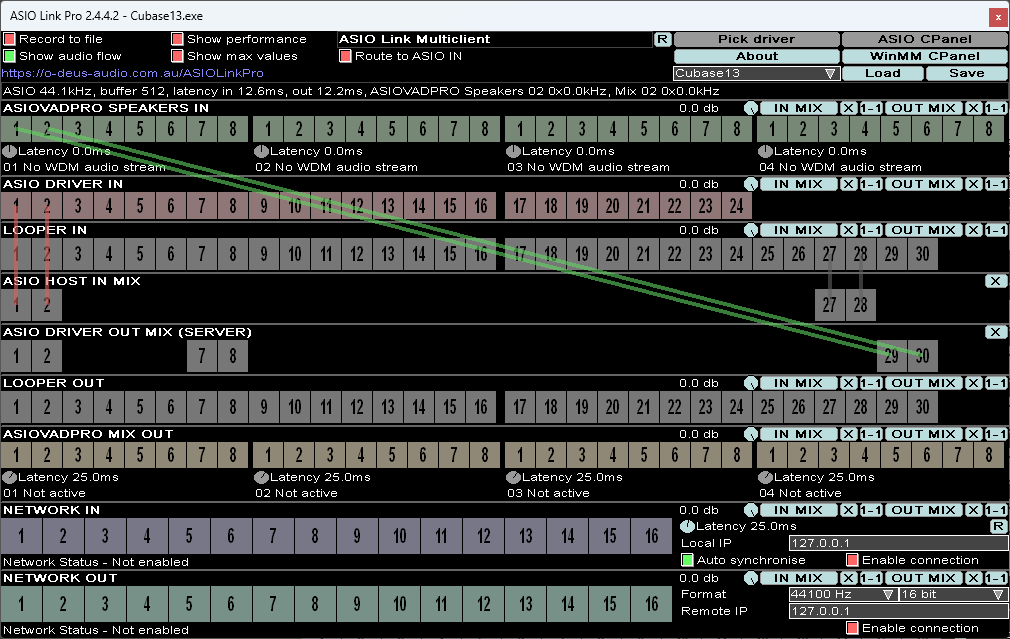
Notice how I don’t have anything connected but ASIO DRIVER OUT pins to LOOPER OUT pins for channels 27-32.
This is because I use those channels to route things like Dorico/Sibelius/Finale/Band In a Box/Etc into the matrix so I can pipe their audio into Cubase, which I use as my main ‘Mixing Desk’ for pretty much everything.
So, I could have Dorico Connect to channels 27 and 28 instead of directly to a set of audio interface outputs; thus, making it possible to route those channels into other ASIO hosts (like Cubase).
Note, once I’ve set up a few things in Cubase, this is where I’ll go to route INPUTS from the ASIO Link Pro matrix into Cubase.
In my Case, I route all OUTPUT through Cubase itself, and it connects directly to the main ASIO Link Pro outputs that are kinda hotwired straight into the Audio Interface (no special connections necessary in the ASIO Link UI). So I rarely have to bother with ‘output’ connections in any of the ASIO Link Pro instances. If I did want to totally bypass Cubase for some outputs for some reason…I’d typically deal with OUTPUT to the Delta 1010 devices from that main, “asiolinktool.exe” instance of ASIO Link Pro.
So…INPUTS, do it from the special instance of ASIO Link Pro that goes with the App.
OUTPUTS…you’ll either connect directly from the App to your interface (Lower ASIO Link channels), or through that main “asiolinktool.exe” instance (I.E. You could do a direct connection from Input 2&3 of your audio device to outputs 1&2, and ‘mix’ it right there in ASIO Link Pro itself).
Today, all I require for output from my Delta 1010 setup is a connection to my Main Speakers and Head Phones through the Control Room. So I’ve set those up here in Cubase itself…
My Loud Speakers are on channels 1 & 2 of the Delta 1010 audio interface, and my Headphone Amp is on 7 and 8 of the Delta 1010.
For INPUT the only thing I want coming straight into the Cubase Mixing Console from my audio interface today are the mic inputs 1 & 2.
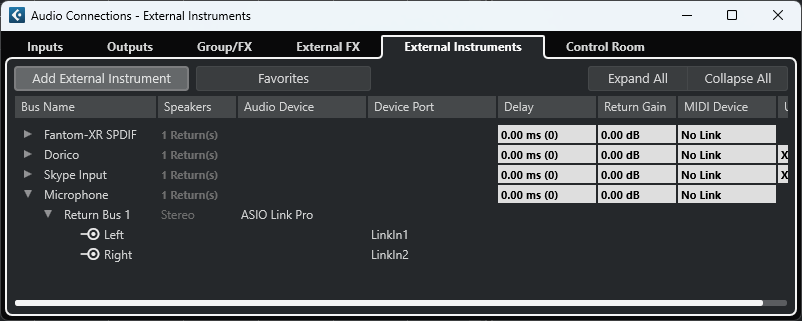
I’ll bring the mic in as an external instrument:
I’ll also be routing in audio from an instance of Dorico Pro over Channels 27 & 28 (remember how I have connections to the LOOPER OUT rack back in my first main instance).
I am doing these inputs as ‘external instruments’ instead of standard inputs so I can get a few more features and routing possibilities out of the deal. Some of the perks of setting it up like this include: More flexibility in where I put it on my Mixing Console, support for AUX Sends, the ability to host VST Effects directly on the instrument channel in the Cubase Mixer, I don’t have to route it through a less elegant ‘audio track’ first to ‘send it where I want it’, and it also gives me some extra flexibility on Monitoring/Arming/Muting/Soloing the instrument.
Once I’ve done this, I now find something new in my “VST Instrument” panel (F11, or in the right pane). I’ll bring these Microphone and Dorico inputs into the project as a “Rack Instruments”.
Next, I go back to my Windows System Tray and Bring up the “Cubase13.exe” instance of ASIO Link Pro. I connect my mic inputs, and the LOOPER inputs that I’ll be carrying Dorico’s audio output.
I don’t need to do anything with the outputs, as those are already connected straight to the Delta 1010 on channels 1&2, 7&8.

I’ll also be hosting plugins and stuff in Dorico to send MTC timecode that can be used to Slave the Cubase Transport to Dorico. That’s a different thread…just ask if you want more info on that.
The short of it is: I’ve now routed the Audio of Dorico into the Cubase Mix.
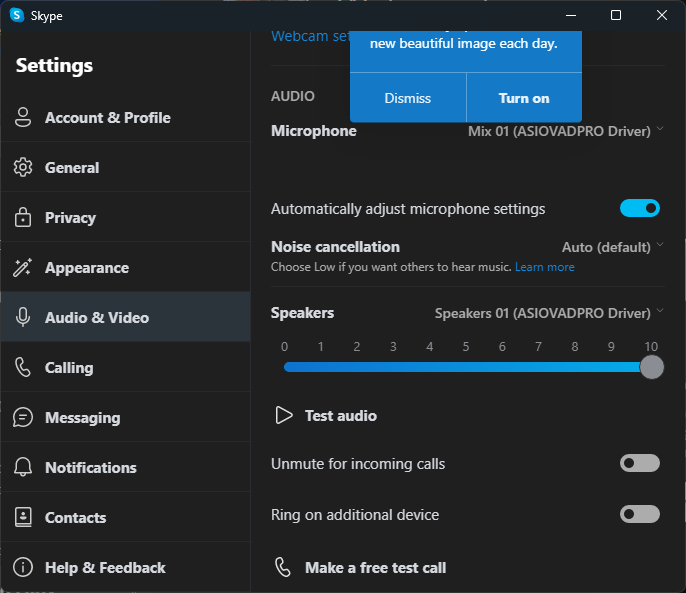
Imagine that the conference app is WDM only. No ASIO! No problem!
I set up skype to use a special set of AUDIO Drivers from ASIO Link Pro, and then route it anywhere I want it to go.
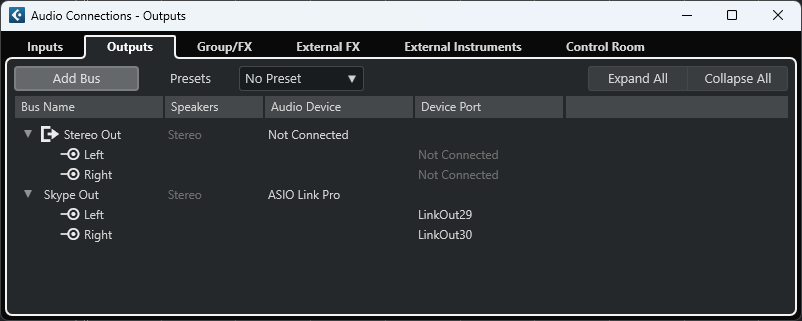
I’ll create a new output on the Cubase console, and route it to another set of channels on the LOOPER rack. Since I already have channels 29 & 30 set up in the main ASIO Link Pro instance, lets go for it.
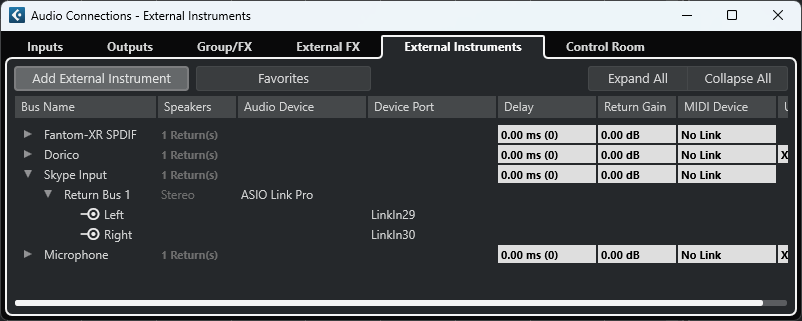
I’ll set up another external instrument for Skype in Cubase and load it in the instrument rack…
Set Skype to use the ASIOVADPRO drivers…
Route the Skype Output into Cubase (In the “Cubase13.exe” Instance):
Route the Skype Out Channel from Cubase into Skype (In the main “asiolinktool.exe” instance):
And finally setup whatever kind of mixes I want to record, send out to the skype conference, and hear on my headphones from the Cubase Mixer…
Thanks very much for all the info, Brian. I’m going to have to look at this when I get the chance.
By the way, it seems the ‘not taking MIDI input’ thing was just the DAW waiting for the ASIO system to respond after adding an output in the Audio Connections. I hadn’t noticed that the Cubase cpu meter was at zero. So when the cpu meter became active again, that’s when things started working.