Help with Sax and Trumpet Vsts' not coming through speakers in the mix please?

Hi,

I have just finished a jazz track, where the main instruments are a Sax and Trumpet interspersed with some vocal samples. They sit on top of Drums, Piano, Synth, Pad, Strings, FX sounds, and an occasional Flute

First, I tried my best to balance the drums with the Bass in terms of frequency shaping and DB output using a UV meter plus low and high frequency cutting with an EQ. All the other instruments were then balanced in view of the Drums, Bass and Vocals. I chose not to process everything using compression or parallel processing etc, mostly because I don’t know how to, but also, because this piece is made up entirely or Vst’s and samples, all of which sound pretty good already out of the box. I also learned a while back that the most important mixing tool is good gain staging and balance in the first instance which I have tried to adhere to track for track, and measure for measure.

As a final step I rendered a lot of the instrument tracks to audio to save on CPU after getting advice from you guys here. (thanks)

Finally, When I exported the finished mix to MP3, I listened to it through 4 different headphones including the studio monitor DT 770, and it sounded awesome, with both the Sax and Trumpet standing out well above everything else. Actually, I had to go through the tracks and automate the volume of each to reduce some of the parts which were too loud. The piece also sound decent coming out of my basic studio monitors. However, when I play the mix though portable speakers of the JBL or Boom Box type, both the Sax and the Trumpet can hardly be heard over the mix, they sound distant and lost with no presence at all.

I tried routing the drums to a separate bus, and then the instruments to another. After which, I then lowered the volume of each bus by 1 or 2db. And although there is some improvement to the lead instruments through headphones, no change can be heard when playing the mix through the speakers at all. The leads still sound flat and distant.

I believe have some options in terms of how to handle the Sax and Trumpet tracks, starting with EQ, and then compression, maybe followed by reverb. But my lack of experience and knowledge warns me that before messing with these steps, I should consider possible fundamental mixing principles which I may have overlooked, resulting in this problem sound.

Just to inform you: I have a saturation plug-in (Black Box) on each of the Sax and Trumpet tracks, as well as a limiter on the master bus. But I wonder if anyone here could offer me a way to maybe start from scratch, disabling all the bells and whistles, and then looking at how to treat the Sax and Trumpet Vst’s from the ground up in relation to everything else. Enabling them to become more present in the mix (and not just in the headphones) please?

Thanks,

Cliff :slight_smile:

Are these devices creating a mono output, or stereo?

[deleted]
Never mind, it didn’t help with the issue.
Edit:
Sod it, I’m going to say it.
Do not mix with headphones.
Do mix on monitors that you know/are familiar with.
Do test on as many speakers as you can lay your hands upon, and in different rooms.
And: Forget The Rules.

Hi Scab_Pickens
I made both tracks mono in that they are panned centre. I believed that would be enough to have them stand out.

The Vst itself also has a comprehensive interface which allows you to configure the instrument dynamics as well as adding reverb from the Vst if wanted. There is a panning function inbedded as well which I set to ‘main instrument solo’.

But that didn’t seem to be enough?

Googly-Smythe

I’m glad you decided to say something, I don’t mind even if you tell me off!
I broke all your rules except for the last one, becuase I have tested through many different speakers as well as the studio monitors and the 4 headphones of course.

I see your point about being too familiar with the sound of a speaker, as your ears may play tricks on you based on what you’re used to hearing versus what you should be looking to hear. Do you think I made a mistake handling the Vst instruments in their raw form in the first instance, or was there something I should have done in terms of processing if anything to prepare them to stand out later in the mix?

I must disclose if it’s okay to, that the instruments are from a Vst set developed by Aaron Venture called Infinate Woodwinds/ Brass, and in my humble opinion the sound is very good indeed! so I think with the correct handling I can make them sound decent in this piece of jazz (perhaps only with guidance though)

Thanks

In my experience, (and I use a fair number of brass libraries from EastWest’s Hollywood Pop Brass, N.I.'s Session Horns Pro, Big Fish’s Vintage Horns 1 & 2, Vir2’s MOJO), in my experience, brass/saxes need to be louder than you think they need to be, if that makes sense.
If the samples are good out of the box, they should only need a little help in the mix - reverb, delay, etc.
I’ve used all sorts of methods over the years, but now I’ve settled on using channel strip plugins on every track (from Plugin Alliance, link down below) with light compression (2dB tops) to even things out, a little low mid cut, possibly a little high boost, frequencies depend on the instrument. I send all the brass/saxes to their own group, which has a bus compressor (again, 2-3 dB tops), which goes to my Full Mix Group, where the smashing occurs!
I use the channel strip faders rather than the track faders, and I don’t like automation.
I use the channel strip saturation features, tailored to each instruments needs.
I use just one reverb (Reverence, sometime Valhalla Vintage) for the entire mix. I used to use up to five, but no more.

Reading that back, I’m not sure it helps!
There are more talented guys here, I hope they chip in, so that I can learn, too.

It’s always OK to say what instruments, etc you use. It can help shape responses.


https://www.plugin-alliance.com/en/products.html#consoles-channels

1 Like

I don’t completely agree with this statement.

I do completely agree with this statement.

1 Like

But, is your actual mixdown mono or stereo? And my point regarding your listening devices was related to listening to a stereo downmix through a device which is producing a mono output. I wasn’t talking about whether the individual tracks were panned center, but what the output was of the final mixdown compared to the output of the listening device.

In other words … doing a mono mixdown check can expose (or hide) things that sound perfect in the stereo world.

Hi Scab-Pickens

of course!

Now that you say that, I am reminded of a few posts and videos I have tried to take on board regarding the value of mixing in mono over the years, and the whole debate surrounding it’s efficacy.

I have a plug-in which converts stereo to mono, and I suppose I could put it on the master bus before exporting my track to Mp3. That might help me to see how the mix sounds when ‘flattened’ if that’s the right term. However, I won’t pretend to be able to properly analyse anything which me be presented to me in the mix down, because I simply don’t understand the science behind the principle well enough.

So to answer you question I guess… no, I did not mix or export the track in mono, but I will do for sure now. I will then play it back through the portable speaker system that sounded so horrible to see if there any changes to the audio information?

1 Like

That sounds like a good idea. It is certainly one the many “dark arts” to get a mix sounding good on all types of playback devices. Good luck! :wink:

You can also do a mono downmix directly through the Export Audio Mixdown.

Googly_Smythe

That’s amazing! Thank you very much. Your process is exactly what I was trying to conjure in my head but I was just getting confused. I will try your approach, taking into consideration everything you said about how to handle instruments like this out the box.

It seems like very little should be required in terms of processing, and I think that I nearly got it right, Although, I may have over-cooked something along the way, maybe with too aggressive an EQ process and an incorrect application of compression. I also leaned heavily into the volume automation on both the Sax and Trumpet tracks, when maybe gentle (correct) compression might have done a better job.

I’ll try again from scratch, (it’s only two instrument tracks, how hard can it be!!)

Thanks again guys, you’re the best

P.s I think the channel strip is beyond my budget right now, but I do have the Black Box saturation plug-in, which could be an asset. :slight_smile:

1 Like

At the risk of coming across as a Plugin Alliance shill, they’re all $29.99 at the moment.

I’ll take another look later,

Thanks again

What is the advantage of this plugin over the Cubase stock plugins?

Just a preference - like mayonaise or ketchup on your chips.

Here are some general mixing tips that may prove helpful.

Start with the arrangement
A good mix always starts with a good arrangement. For each instrument to be heard clearly with good separation requires that there isn’t a pileup of instruments that occupy the same frequency spectrum all playing at the same time. Allow your arrangement to give each instrument some room to breathe.

Use reference tracks
Find one or two existing songs that matches your creation as close as possible in terms of instrumentation, style and feel. If possible, bring this reference track into Cubase but make sure it isn’t affected by any plugins or EQ that may live on your Stereo Out bus. (There are a couple of different ways to ensure this. If you’re using Control Room, you can route the reference track to a Cue bus which allows you to switch between the reference and your mix in Control Room.)
It’s a good idea to loudness match the reference track to your mix. Remember that the human ear tend to perceive louder as sounding better. Get a loudness reading of your mix and use Loudness Normalization on your reference to match.
When comparing your mix to the reference, listen critically. This brings us to the next topic…

Listening skills
Knowing how to listen as a mix engineer is a skill that develop with experience. Try to focus on specific frequency areas and assess what’s going on in terms of clarity, dynamics and depth. Practice this skill by listening critically to commercially produced music. You can ask questions like “Where does this instrument sit in terms of panorama and depth (back to front)?” or “What frequency range does a particular instrument fundamentally occupy?”.
When you start your mixing project there are a few tricks you can employ that might help you get to your end result faster. One of them is to start in mono. All mono channels panned center and stereo channels turned to mono by use of the Stereo Combined Panner. Start by setting the volume levels of all your tracks, trying to achieve a good balance as much as possible. As you progress by making EQ adjustments, taming dynamics with a compressor or adding space with a reverb, remember to adjust your levels to compensate. Cutting with an EQ for example will lower the perceived loudness.

Another good trick is to check your mix at a low volume level. Turn your listening volume all the way down and slowly raise it until you can all the individual instruments. (You can use your reference track for this.) Does the balance between instruments in your mix sound the same as it did when you listened to it on a louder level?

Listen to your mix on different speakers in different rooms. When checking your mix on a different set of speakers, I recommend listening to some other music on that system first (it could be your reference track) to get your ears accustomed to that environment.
Try to work quick and take breaks. Our brain has a phenomenal way of getting accustomed to what we hear. Listening to the same material for hours can be truly detrimental to your decision making. “Ear fatigue” is an issue and kicks in a lot sooner than you might think.

Beware of the Solo button! When applying EQ, dynamic processing or spatial effects it is critical that those are done in the context of the rest of the mix. A solo’ed instrument typically never sounds as full and complete when in solo as it does in the full mix.


Lastly I would just like to add that Cubase Pro comes with all the tools necessary to craft a great sounding mix. If you’re new to mixing, I would recommend you learn how to use all the common tools, such as EQ, dynamics processors (compressors e.g.), reverb, etc, before shopping for new shiny plugins marketed with a plethora of hyperbole.
If your mix is suffering from issues like muddiness, lack of separation or just flat sounding, a new channel strip plugin is notgoing to solve that problem.

3 Likes

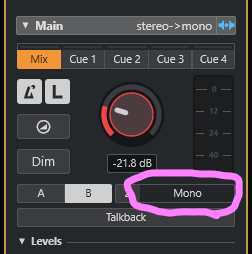
If you use Cubase Pro, the Control Room can switch between stereo and mono with the click of a button:

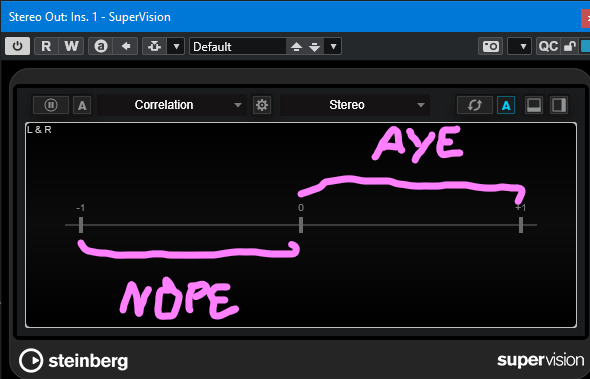
Furthermore you can visually check if your mix is mono compatible by using the Cubase plugin SuperVision.
Use the Correlation module. Anything above zero is mono compatible. Below zero will lead to cancelations.


Load it as the last insert on the master out bus or in the Control Room.

1 Like

A tiny addition to @Johnny_Moneto 's advice: It’s perfectly alright if the correlation meter flickers below zero. Even bigger movement in that area is okay if you have decided whether or not this is relevant info for mono compatability.
Speaking of mono compatability: there are engineers who don’t care that much anymore about it as long as the main info is conveyed. Most listening devices are stereo anyways these days. Moreover, there are very successful mixes which almost completly collaps if turned to mono.
What I’m trying to say: It’s definitely a good idea to check for mono compatability but I wouldn’t go into panic mode if the correlation meter flickers to the left.

1 Like

Referring to @Googly_Smythe 's advice to use light compression on every single track and busses instead of one BIG gun on your 2-track (multiple instances of compressors instead of one instance): That’s very solid advice to not only avoid unwanted intermodulation effects but also audible pumping.
Compressors have a massive impact not only on dynamics but also on sound (as well as other aspects). That’s why the choice of compressors is crucial. First, learn how to deal with dynamics in general, though.
Nice summary of general mixing tips , @mlib :+1:

1 Like

If you don’t want to end up re-mixing everything in order to fit in louder horns, you could always try a parallel compression bus dedicated to them that you could blend in with the stereo bus. That’s what I would do first.