The mixer visibility bug is a known issue, so it’s confirmed.
Awesome, well awesome its confirmed cause I thought I was going crazy!
Looking forward to the fix and future updates. Scripting my own personal controller is fun!
For those of you following the develop branch (link further up in the thread) your welcome to try the new version which now has:
- Better display handling (I hope)
- Channel Strip, Control and MIDI CC pages
MIDI CC requires an extra virtual midi port and since midi remote doesn’t seem to always pick up the change you may need to disable then enable the script after you refresh it. When you enable it Add the Icon back in and it should ask you for 3 midi ports, the two normal ones and the virutal midi port for MIDI CC which you can then route back into Cubase via All Midi In.
I had to make more than a few guesses about API usage in places but it seems to work. Midi Remote has some on OnDisplayValueChange behaviours. If you move a fader in Cubase the Motorised Fader will respond immediately but the display update won’t trigger until “some time later” - usually when you move the mouse over something else. I don’t know why, it’s rather confusing. OnProcessValueChange is immediate but it’s nigh impossible to map that to a display string for every possible combination of binding. Anyway, one a zillion quirks that will no doubt be resolved over time as we all get used to midi remote.
Nice Robw.
I see you went ahead and adapted the MIDI CC concept, and cool to see how you are handling some of the “issues” I’ve also was trying to figure out how to deal with.
Keep up the good work, it’s awesome that you are sharing it all with the community!
Yes, hopefully some of those many quirks will get resolved.
Right now I also have the issues with not displayValues not getting updated when you change them in the DAW. It seems to me that it’s only the QC display values that will update bidirectional (so the display values also updates when changing the parameter with your mouse). But the onValueChange does update at least.
Thanks @saxmand. And my apologies, i meant to put an acknowledgement to you for the MIDI CC idea in the announcement but it slipped my mind.
I have some time off work at the moment and hope to use the v2 development to actually write some music! No doubt I will improve on some of the layout and behaviors once I start using it. I have some ideas on how to tweak the display usage further now I have more of a handle on where the limits are.
Hopefully I will package and make this a final release in the next couple of weeks.
Cheers and keep the feedback and suggestions coming.
All good @robw. I think it’s great we can share and learn from each other.
I basically ended “abandoning” my Icon Platform for now, especially cause I didn’t feel the display functionality was sufficient. And also cause it was on my side, so doing simple changes could removed my focus from my center/main-screen. I also found some values/functions didn’t work as well for the long faders (on/off, EQ types etc).
So now instead I’ve been developing a “controller” where SoundFlow becomes the middleman receiving all the SysEx. I can then create surfaces with buttons etc having full names etc on my iPad in front of me. Now I’ve set it up to also be controlled by a Kenton Killamix Mini controller which has 9 endless encoders.
Quite happy how this works for now, as I can also more easily utilise SoundFlow when the MIDI Remote API falls short. For instance I can make sure that I can see the EQ if the channel settings window is open, and I select the EQ, or show the ChannelStrip when selecting that, and change the plugins in the ChannelStrip. Unfortunately SoundFlow is MacOS only.
Here’s a picture how that sort of looks like:

I use metagrid on my ipad for similar functionality.
I was thinking a raspberry pi with wide but short (top to bottom) touch screen monitor connected to the icon would provide a nice middle piece of kit to orchestrate messages. Shame I didn’t happen to think of that before I plonked out the cash for the D2 display. ![]()
For the moment though the D2 is serving it’s purpose and after some actual use I have some idea what I want to know when I reach for it that isn’t on the screen (yet). .I have Fader and Pain alternative views (switched with the Mixer button) but could make that also have a full title for selected track view for those times when the labels don’t compress to abbreviated versions very well. Of course I could just look at the monitor in front of me ![]()
It’s a whole heap better than the very limited Mackie setup though!
hmm, it occurs to me I have a left over iPad Mini in a draw somewhere - if I can get that to receive midi and display stuff, then another output on the Midi Remote could…
maybe I should just write some music instead!
Totally much better than the Mackie. Especially cause it gives so much more flexible.
I was also busy with the whole external display thing for the Mackie already years ago, but there doesn’t seem to be a marked for the wide touch screen monitor. At least I haven’t been able to find any in the normal consumer marked.
And what the D2 has going for it, is that it’s a closed system, which definitely simplifies some things. It’s just so little screen estate and it’s also a bit clunky I think.
Haha, yeah sometimes I also end up spending so much time trying to solve and come up with better tech solutions, where I should probably just have written music instead. But for me it’s also another way of being creative though.
And like any system (or DAW) it’s also about getting used to it. You actually don’t know if a system is logical/efficient for you before having used it for a while.
Ps. in the picture I posted it’s only the 9x3 blue/grey squares that’s connected to the MIDI remote API. The rest is just functions in SoundFlow.
Icon Platform M+ MIDI Remote - v2.0.0 Release
New features:
- Support for the D2 display - it will work if you have one.
2.New Page - MIDI CC - for “normal” MIDI CC messaging to All Midi in using a second MIDI Port - Mixer button on the Icon now switches the D2 Display from showing the Fader information to the Encoder information (when lit it is on Encoders)
- The 9th Fader is now ALWAYS Value Under Cursor - when you touch it the display will provide information about what you are controlling. When you release it will (most of the time) return to the previous display.
- New Page - Channel Strip - When you have an active channel strip this page will let you control the parameters with the faders. Note if nothing is active it will display nothing on the controller.
- New P:age - Control Room - I have this setup to control the Main Control Room output and the Phones output. There is plenty of room on the controller for Cue Sends, additional channels - but my studio is very simple!
Installation
- Set your Icon Platform M+ to MCU mode if it isn’t already on it - see the manual for how to do this though it is the default so unless you changed it your all good. And if you did you obviously know how to change it

- Go to Midi Remote
- Add Surface
- Import the script:
Icon_Platform Mplus_v2.midiremote (13.7 KB)
V2.0 includes the ability to send MIDI CC messages without passing through Midi Remote. To do this a second Virtual MIDI Port is required I use Loop MIDI on Windows 10/11. My understanding is Mac has a similar capability built in. Create a virtual Midi port and in Cubase include it in ALL MIDI In.
Now the Platform M+ midi remote won’t find the midi ports automatically as I couldn’t get it to marry up the virtual MIDI port for some reason. As a result you will need to set them when you add the MIDI Controller Surface in Midi Remote. Settings will be like this:
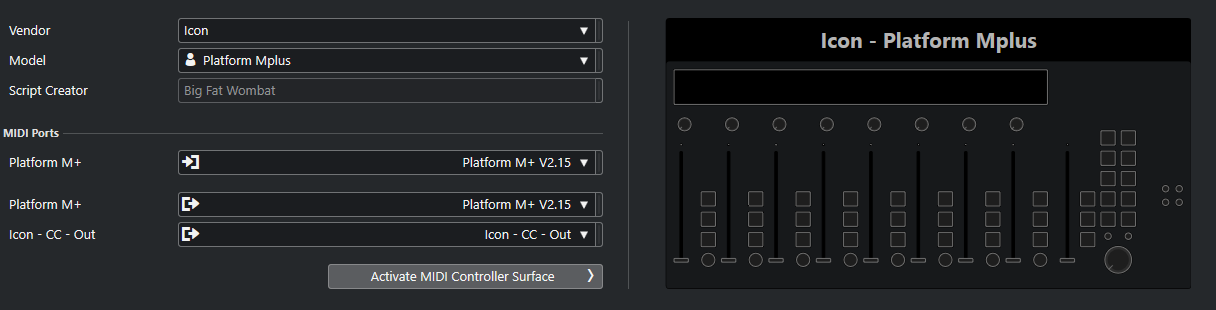
With the second output being whatever you called you virtual midi port.
Use
You can hover the mouse over any surface element in the midi remote and it will show a tooltip with the functionality. The icons used in the midi remote are often confusing so tooltips are your friend.
There are two pages for the Fader Area:
- Mixer - controls for the current bank of 8 channels (auto banks with Cubase selection)
- The midi remote suface shows all the functionality. Track Selection is on Fader Touch so the Sel Buttons can be used for monitor on/off.
- Selected Channel - has 4 sub pages for the Selected Channel:
- Sends and Quick Controls
- EQ - all 4
- Pre Fader
- Cue Sends
The first 4 record buttons are used to select each of the subpages which then change parts of the fader surface control area. Any controls not used by a subpage will remain bound to whatever was last used (not sure if this is a feature or not but I couldn’t find a way to tell a subpage to unbind a control it wasn’t using).
Pretty much every available function is mapped to the knobs and buttons in each of the sub pages. Use the mouse to hover over them to see what is assigned where.
For convenience (and partly to get around some confusion from not being able to unbind) some on/off functions are mapped to Knobs and Sel buttons. This proved handy for A/B comparisons in the EQ page since I was holding the knob anyway I could just push it on/off.
The Transport and Fader sections are the same for both pages.
The Main Fader can switch between:
- Main Output Control - more correctly its the first Output, which is Main for me but I only have one output
- Control Room Phones Level - again the first headphones channel
- Control Room Monitor Level
- AI Control - hover your mouse over a value and the Master Fader will snap to it and control it.
- To switch function use the Mixer button to switch through them.
Read and Write buttons control the Selected Channel Automation Read/Write
Transport Control:
- Play, Stop, Cycle, Record, FWD, RWD are all as normal
- Channel Next/Previous - Next/Previous Page at the moment but might just make one of these cycle and the other be Click on/off or something useful.
- Bank Next/Previous - Next/Previous Marker - this might be more useful as something else in future.
** You will note the lack of channel/bank selection from the surface. Midi Remote auto banks and the Jog wheel can be used to scroll through channels so I figured coopt these buttons for other uses.
Jog wheel - okay this one is a bit complicated. It’s almost the same a the Mackie control functions the Icon series provide and works with the Horizontal and Vertical Zoom buttons - including the “Press them both and they switch function mode”.
Normal Jog wheel mode
- (Normal) Nudge Cursor Left/Right or Jog (with playback). This will nudge less if you turn slow and more if you turn fast. To switch between Nudge and Jog, Push the Jog Knob.
- (Zoom Horizontal/vertical buttons active) - Two modes, switch between them by pressing Both Buttons at the same time. There is no visible change until you then select one of them to activate it. At which point the Midi Remote surface will show different functions in the lower right
- Mode 1 - simple Horiz/Vertical Zoom
- Mode 2
- Vertical Zoom - Track selection next/previous
- Horizontal Zoom - Next/Previous Event on the selected Track
Most knobs, jog included, are turn speed sensitive. Turn slow for fine control, turn fast for coarse movement. This is part of how the Icon Platform M+ works and I just made it so the facility passed into the Midi Remote.
Channel Strip:
First thing to note if you cannot to my knowledge turn on any part of the Channel Strip from the MIDI Remote. You must enable the Compressor, Noise Gate, whatever in Cubase first, then everything springs to life on the Icon Platform M+.
So assuming you have turned them all on:
- Faders will control the various parameters (the first 8 of them anyway)
- Sel buttons 1-5 will select Gate, Compressor, Tools, Sat, Limit - subpages and the Faders and display will change accordingly.
- Rec buttons will light up Gate, Compressor… are active. They are supposedly connected to Activate Plugin and you can push them on/off but they will not active an empty slot - probably cause you have a choice to make when that is done.
- Mute buttons will Bypass Gate Compressor…
I’ll leave other functions to tooltips and experimentation for you to figure it out! ![]()
Source code available here: GitHub - woodcockr/midiremote-userscripts at develop
Shoutout to @saxmand and @dimonskinke for many useful suggestions and sample code.
Hello
I tried to load a script that somebody made for my controller (Icon Platform m+) into Midi remote and got the error message: “Script Archive could not be imported.”
The way I tried to import it is just by clicking the import script button and selecting the right file from my downloads folder. I also tried putting the file in the Midi Remote Driver script folder (under local->Icon->Platform Mplus). And then loading it from there, but that just gave me the same error message.
I have no idea how to solve this problem…
I linked the midiremote file below.
Does anyone know what I’m doing wrong?
Thanks in advance!
Icon_Platform Mplus_v2_alpha2.midiremote (13.1 KB)
Nice work robw.
If you want to “fix” the values/bindings that doesn’t get overwritten when there’s no binding connected, you could use an “empty” custom host value. It’s a hack but a possibility. It would look something like this:
    var empty = page.mCustom.makeHostValueVariable('empty')
    page.makeValueBinding(surfaceElements.channelControls[2].subPage_button.mSurfaceValue, empty).setTypeToggle().setSubPage(qcSubPage)
Best. Jesper
Sorry to hear the MidiRemote file is giving you trouble. V2 full release is now out, link in the post above yours.
I don’t know much about how the MidiRemote export and import of files works, only that I hit Export and it does Import.
Maybe when it imports it is attempting to unpack the file and there is something in the way from your previous attempts. Try deleting the Local->Icon folder completely then using the import for V2.
Very cool, awesome script. Everything works.
Is there are a way to add it permanently? Have to add control surface everytime I start Cubase
That is odd. Mine comes up automatically once the initial midi connections are done and the project is saved.
Yeah, it is odd. My other controllers show up automatically, but not this one. If I open a saved project with this script I can start new project and it is there, but if I start Cubase with empty project I have to add the control surface once again, the script is there, but not the Midi Remote itself. Maybe it has to do with the port naming of Icon Platform?
Hello saxmand,
very impressive!
Once you activate “Inserts” are your encoders mapped to preassigned parameters of the plugin in focus and does the bottom row on your iPad show the parameter names and values?
Thanks, Emre
Sounds like it is saving the MIDI port parameters with the project, and with a completely New one requires them to be configured.
I had the automatic MIDI port identification running when the code didn’t have the additional MIDI CC page. I’ll look at what happens if I standardise the name of the MIDI CC port and see if it can automatically look them all up that way. It will require that the Loop back port be given that name to work but that’s probably less a bother than having to configure them each time for a new project.
I won’t get to this until the weekend I suspect but will let you know in this topic when there is a new version.
Did you install from the source code or import the .midiremote script?
Just I’ll know to bundle it up appropriately.
Thanks for getting back. I’ve imported the .midiremote script. Did not install via source code.
Yeah, it saves the port parameters only within the project, and yeah the port name is totally not a bother.
Sure, will be waiting here. No hurry, huge thanx for the script and the work you’ve done. Having to use all the faders with auto-follow is a godsend ![]()
Hi Emre.
Don’t wanna highjack this thread as it’s about the Icon Platform, but to answer shortly:
Yeah it’s basically super dynamic, build around the 9 endless encoders.
- The top of the blue rows is the page selection. So QC/FQC, channelstrip, EQ, inserts, etc.
I’ve also made pages where I can use the encoders with for instance audio editing commands, or navigation - The second row is for subpages if they exist. So for the EQ there’s the various bands, etc. For Channelstrip it has the varies elements; saturation, limiter, tools. But can also use them for shortcuts, and other items.
- The bottom row shows the name of what the encoder controls and the value.
I can change pages, subpages etc by clicking the iPad, or I can click the respective encoder down to change pages (the first row), or the buttons below to access the second row of functions.
The reason why I ended going this route is because I wanted more clarity than what I could get from the Icon. Also it’s nice how encoders utilise the API a bit better. But I’ve coded with SoundFlow that I can du super fine adjustments with the encoders, when holding down modifier keys. Basically I can get it as fine grained as 16383 ticks for a value. This is really nice for volume automation or precisely adjusting of an EQ band.
I’m still developing it and hope that it can be shared in some way, but it is relying on SoundFlow too.
I’m also planing on developing a control surface in SoundFlow that utilises the MIDI Remote API to its fullest.
If you have more questions on the controller/setup, I’ll gladly make a video of it, and share it in a new thread.
Best
Hello saxmand,
for the sake of not highjacking this thread I`ll just answer shortly:
It would be brilliant if you could share your project and give some insight in a new thread, it would be of massive help. Basically I’m trying to achieve something very similar but with a self made hardware controller. Once I have the basics working I will share my project as well.
I’m very excited, thanks again!
Emre