I’m demoing Cubase Pro and have a few questions/concerns regarding rendering virtual instruments, in this case multi-output drums ( Superior Drummer 3).
Do the resulting audio tracks not maintain the routing out to multiple groups? I typically do a rough mix as I write/program. I had setup some parallel compression on the drums. But when I render, only routing to the 1st group was maintained. The others were removed.
Any way to get pictures from the multi-output tracks onto the resulting audio tracks? All the multi-output tracks took on the picture from the main instrument track.
Any wat to opt out of inputs being automatically assigned to rendered tracks? I won’t be recording over the rendered audio. Easy enough to remove, but why?
Since this is VI to audio, and I’m deleting the VI tracks in the process, any option to keep the original names of tracks without the (R) tagged to the end? I work mostly with VIs, and changing the name of every rendered track will be a PITA.
Not render related, but is it possible to get the multi-output tracks to show in the project window?
I’m finding a lot to like about Cubase. Massive feature set! But man, it has some quirks & long winded ways, at least coming from Studio One. To be the more mature DAW, I’d expect Cubase to be the slicker of the two.
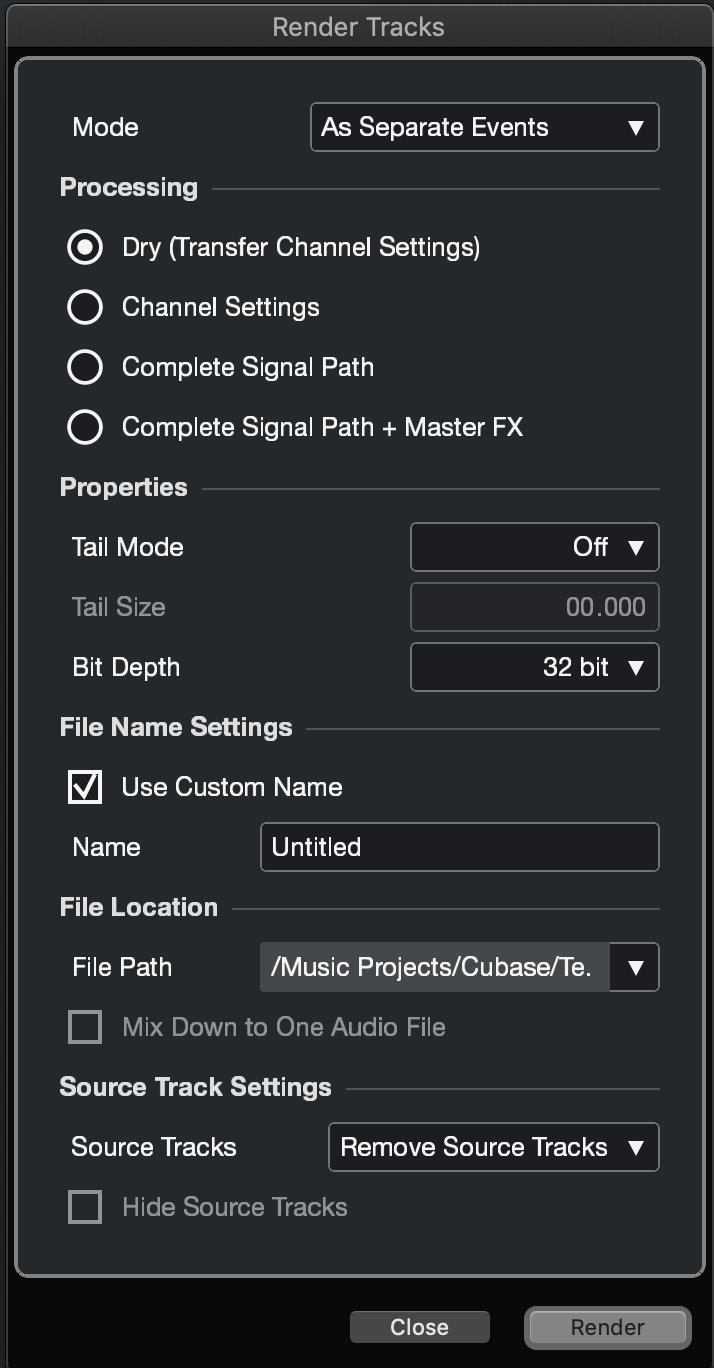
If I render the complete signal path, wouldn’t that print the effects into the drums’ to audio tracks? That’s not what I’m looking for. I want the dry signal with all plugins still in place so I can continue the mix.
If such functions do not exist in Cubase we can make them ourselves. In this case I used the Project Logical Editor (Cubase Pro only) to remove " (R)" on tracks that contain “(R)”:
Then I use “render in place” on the first midi track (in my example “Kick”). As a result I get an audio track for each audio output of the VSTi. Only the Kick track has a signal.
Is that what you do?
And please tell us what would be your expected result?
I understand all outs will be rendered. I want the routing to stay intact. The 1st bus remained after the render. Any buses I had after that were removed.
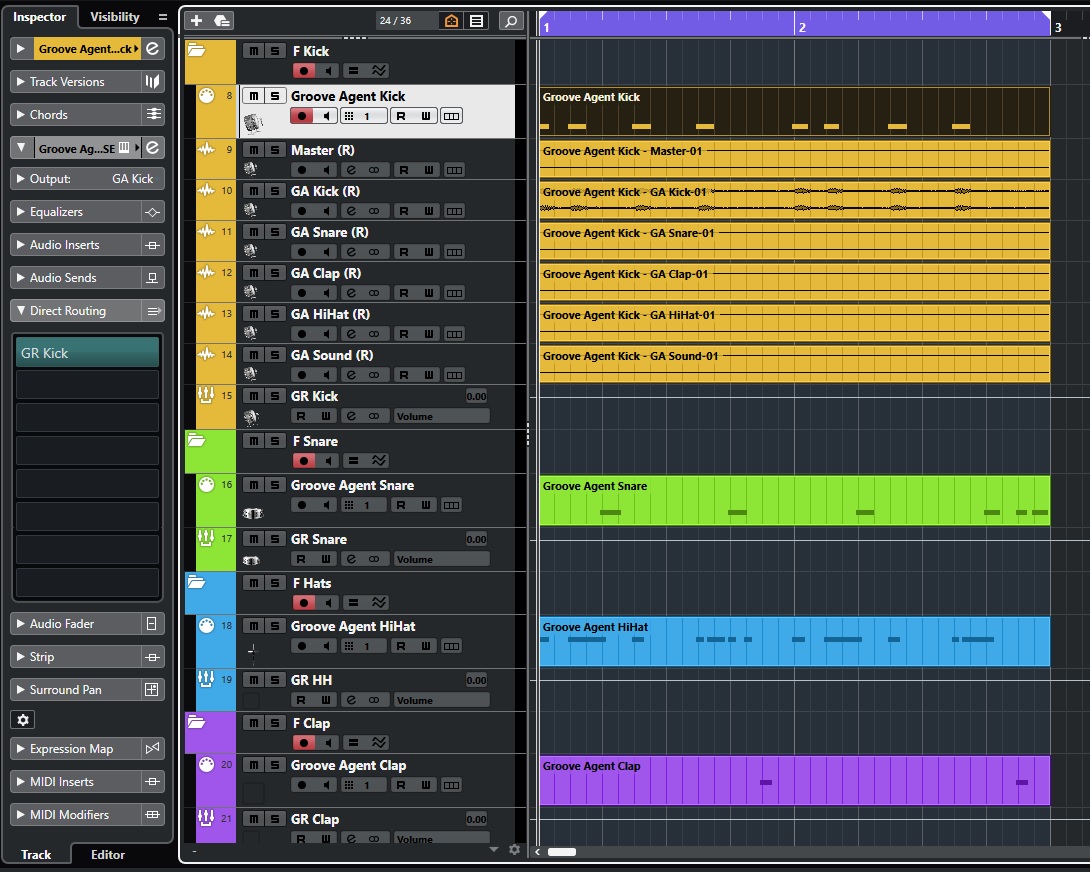
I tried what you described just with a Midi track instead of an Instrument track. Also I routed 5 instruments to 5 outputs and these 5 outputs to 5 groups. (The number of channels shouldn’t matter)
I colored the VSTi output and its respective group channel the same colour. Kindly ignore the (unused) Master channel in between.
As for the pictures:
If you use a MIDI track as I suggested, you can “dissolve it” into several MIDI tracks (e.g. each used pitch gets its own track) and assign different pictures to those. Cubase will take the picture from the track that gets rendered, not from the group track that an output is assigned to.
From what you describe and what I see in the screenshots, you routed each channel to a different group. I’m routing each channel to the same 4 groups (parallel compression).
Regarding the pictures, I do not want to program each drum part on a separate MIDI track. Too much work. Some kit pieces have several articulations. For 10 kit pieces, I’d end up with 20-30 MIDI tracks and would then need an additional bus for snares, hats, sometimes kick, ride, cymbals, etc.
Ok, to use Direct Routing for parallel processing seems a bit unorthodox to me.
I would usually create FX channels for this (send the signal via ‘Audio Sends’) and route their output to whatever group I need.
Regarding separate MIDI tracks: This can be the last step before rendering, after all your other work is done.
Anyway, there is does not seem to be a way to automatically assign pictures to tracks based on their name or output routing.
Sends it is. I misunderstood the use of Direct Routing. Other than not surviving a render, what’s the difference between sends and Direct Routing?
Regarding separate MIDI tracks, each articulation would be a different pitch. So a snare, for example, would end up with a separate MIDI track for center hit, edge hit, rim shot and side stick. Hats, ride, cymbals and even toms would be similar. I would have to recombine all those MIDI tracks or deal with separate audio tracks for each of those. But it seems like Direct Routing vs Sends was my issue.
Any thoughts on the remaining questions?
I’ve seen it in a Youtube vid, so I know it’s possible. How do I get the multi-output channels to appear in the project window along with the instrument track? Is there a setting somewhere?
Not a big deal as I can delete or ignore the audio input assignment. But why would that be added to a rendered audio track? Why would Cubase anticipate me recording over a track I just rendered? Quirky!
I’ve been poking around. I seem to be the only once concerned with the (R) tagged onto a rendered track. I get this for audio to audio rendering as you wouldn’t want 2 audio files with the same name. But this is not an issue with MIDI to audio rendering, especially since I’m deleting the instrument tracks. It would be nice to have an option to keep the original name.
Please look at my most recent screenshots. There you see the individual outputs in the project window. Are you looking for something else? Then kindly post a link to the video you mentioned.
Please look at my first reply how we would go about it in Cubase Pro. The Project Logical Editor is quite powerful and there are many users here that use it and Cubase’s ability to create macros to create functionality they need at the fingertip of a key command.
I am using Nuendo for audio post, and a bit of music here and there, and I deal with this same feeling every day (I’m a big Studio One user too). There are so many aspects of Cubendo that feel so out of date and old compared to S1. I would really love to see Steinberg update workflows in the upcoming releases, instead of just leaving them as it and tacking on new random features.
No, I’m looking for exactly that. I’m asking how did I get them there? When I activate outputs for drum instruments, including Groove Agent, I don’t get the multi-outs in the Project Window. Might there be a setting?
Ahh, I missed your response with the Project Logical Editor. Perfect!
Maybe it’s been an advantage for S1 coming after. See the complaints for Cubase and do it slicker.
But Cubase is definitely more feature rich for what I do. The Mixer alone is looking to be worth the cross grade. Cubase has a proper Drum Map. These and several other things will be very beneficial. But yeah, it would be nice if they focused workflow improvements. There are definitely slicker ways to do some things.
I’m likely going to cross grade to Cubase. But it may take a while to fully switch over. I’ve heard Cubase is one of the tougher DAWs to get comfortable with and it’s proving to be true.