I’m a filmcomposer/producer working in logic for the past 10 years, and I’ve tried switching to Cubase after hearing many good things about the DAW.
I’ve had Cubase for 3-4 weeks now and I find that my workflow is very slow in the software. Partly due to the change of work environment, but I also find Cubase has a tendency to slow me down. I want a piece of software to be transparent and not get in the way of my work. So far I can’t say that, that is my experience with Cubase.
Beware that the following criticism is based on my initial experience with the software and there might be solutions that I’ve missed in my research. I’m hoping that Cubase will listen to this and hopefully help other pro’s transitioning from Logic to Cubase.
Here’s a number of observations.
I’m missing chord information as I play and improvise on the piano. It’s a nice and simple feature in Logic that helps me a lot when I’m composing. Although I’m highly trained I compose by ear and intuition and spend a lot of time checking out different voicing, spacings, chords etc. The info from the software provides me with an analytical overview as I dive deeper into my harmonies. I miss it in Cubase.
As I’m sound designing I find it hard to open the plugins I’m working in. It might be kontakt or Omnisphere. If I have to open the software as I’m fiddling with delays and eq’s at the same time, I have to open the arrangement window and click the individual track. Is slows me down a lot and makes me miss working in Logic. I want to acces to the VST within the mixer. Please.
I want to be able to switch a track from mono to stereo simply fra clicking the within the mixer. As I can in Logic.
As I’m preparing to write for a tv series, game or movie I spend a lot of time creating a bank of vst’s/plugins that fits the project I’m working on. It can be a very finely tuned combinations of soundtoyz, UAD and a kontakt instrument or vst. In Logic I can save this combination into a folder, whereby I can easily acces the instrument+plugins in another logic project. It’s a huge part of my workflow and when I found out I couldn’t do that I Cubase I started working in Logic again. Please make it possible. I now there is workaround with this, but my generel critique is that something I can do easily and fast in logic by clicking one time takes 3-4 clicks in Cubase. If you work a lot in a piece of software you want it to aide and speed up your proces. Not the other way around.
As I record musicians in my studio I’ll have dual mic setup of cardiod microphones and ribbon mics. I’ll record a cello or violin with both microphones and add them to a track stack. That way I’ll have acces to the stereo image and can compress and treat the audio individually and as a group. It’s a huge part of my workflow. I miss this feature in Cubase. I do not wan’t a folder track and a group track for each dub of violin or cello. It’s cluttering my mixer and arrangement and making me work slower once again. I’ve noticed some people enjoy this division between folder and group and I understand that, but I miss the combination as a track stack in Logic.
I’m missing the ability to see the sends channels from the inspector within the arrangement window. When I’m sound designing I want to work swiftly and see the channels I’m working on simultaneously.
Generally I find sends to be unnecessarily complicated. I have to create it, activate it and route it with 3 different gestures. In logic it’s one movement and the bus is created and I can see it from the inspector. It slows me down. Furthermore the sends in the mixer window seems a bit unresponsive. I can’t go from -6 db to +10 in a small movement of the mouse. It’s not musical for me.
Key commands. I’ve found that I can’t always count in the key commands i’ve changed will actually be changed. For a piece of software at this price level - Cubase is far more expensive than Logic and Ableton - that’s kind of a problem.
Maybe I’m missing something here - but if I have to delete and object or region (logic lingo) within the arrangement window, I’ll just press delete. In Cubase I have to select the eraser tool and delete. Once again I have to press a button 3 times instead of one. It slows me down. If there is a faster way. Let me know.
Automation. I have a hard time understanding automation in Cubase. All the points are hard to move in a simple manor. Maybe I’m missing something. I’m missing the ease of use in logic.
The GUI seems a bit old. I’m sorry but compared to the magic of fabfilter plugins there’s something off with the general feel of the software.
As I said I’ve spent 10 years within logic so a transition from such a lengthy relationship is not always easy. But for now - these are the 10 main reasons I’m gravitating towards working in Logic. I just thought you should know. As I’m using the software I have feeling that the people who are making this stuff aren’t really pro’s themselves and hence are not aware all the small details that make or break your experience. Maybe I’m wrong, but it feels that way.
Why aren’t you implementing the best features from other DAWS and cross-referencing in order to make the best user experience possible?
Cubase seems to be a standard for many accomplished composers, but so far I haven’t really felt the magic of the software. I’m sorry. I would love to. Really.
Some things I love about Cubase:
The Mixer. It’s fantastic. Gain staging is amazing. The separate windows and how customizable it is. (Just add instruments please)
Midi. It’s a level beyond Logic. Without a doubt.
Exporting. One of the main reasons I switched. Creating stems is a breeze compared to Logic. I dread creating stems for a film or tv series in logic. It’s a hassle. Cudos for your work here, Steinberg.
The sound. Logic has a tone in my experience. I wanted to get rid of that. Cubase seems cleaner and wider.
I’m pretty sure half of these can be done but I don’t have time to reply to everything atm.
6.) Sends are accessible in the inspector? Maybe you need to right-click add them to the inspector list?
There is a preference to automatically connect sends - ‘VST - Connect Sends Automatically for Each Newly Created Channel’. You can keybind this toggle preference to a keyboard shortcut.
There is also in preferences - ‘Default Send Level’ and ‘Default Pre-Fader’ as well as ‘Mute Pre-Sends When Mute’.
You then also have Mixer Functions: ‘Add Track to Selected: FX Channel’ which creates a new FX Channel and connects automatically to whatever audio/group/fx tracks you have selected whether one or multiple.
Furthermore, you can utilize Q-Link in the mixer to select multiple tracks/channels and change your send parameters across all of them simultaneously including their enabling/disabling, routing, level, etc - and this can be done either Relative or Absolute.
Have you tried long clicking on the little e in the mixer channel for the Instrument plugin?
p.s. There was a recent widely publicized survey about Cubase, where Steinberg invited Cubase users to provide feedback. Did you use that invitation to share your thoughts?
I’m aware of the options you’ve mentioned and many of them are great.
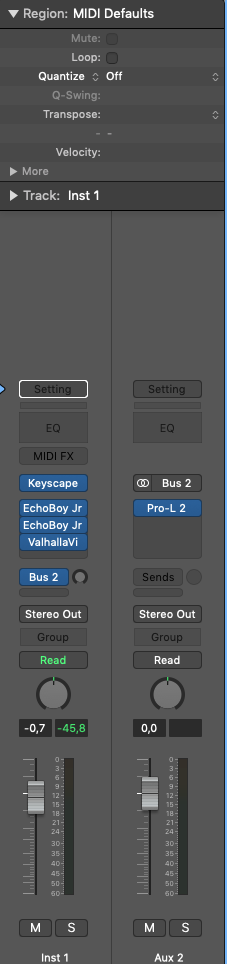
Regarding 6 it not the ability to the sends, but to se the actual send channel within the inspector as i’m working. I’ve attached an image from Logic Pro X.
Yes. But then i have to click again to acces the vst. I know it’s a small detail, but it becomes cumbersome the way i work, with a lot of small tweaks depending on the dynamics, comp’s eq, etc.
@vncvr, he isn’t talking about seeing the send levels from the current track. He is talking about seeing the complete Aux Channel (FX or Group Channel) with fader, plugins and pan, to which the send is routed.
The Logic inspector shows 2 ‘complete’ mixer channels. The current track mixer channel, and a destination mixer channel.
Then just use the mixer and the various utilities to show/hide channels wanted/needed?
You get 3 mixers, so one of them could be dedicated to this type of channel overview - there is for example the command/function ‘Show Channels Connected to First Selected Channel’ to help facilitate this.
That’s a good idea. How do you switch which of the three mixer consoles shows in the Lower Zone? Is there a key command?
Update: So I tried to get this working like Logic’s Inspector. I used Cubases Workspaces, and created a workspace for my Main One Window View, and a 2nd work space to mimic Logic’s 2 channel inspector. In the 2nd workspace, I created a narrow MixConsole window to the left of the regular window that shows 5 channels. Using the ‘Show Channels Connect to First Selected Channel’ works and mimics the functionality.
Problems: The narrow mixer window doesn’t follow the selected track in the main window like Logic. I found I had to click on the narrow mixer window, and hit my key command again to update the mixer to the new selected track. I guess this could be a positive though.
Good thing learned. Workspaces in Cubase activate in a more visually pleasing way. Workspaces in Logic lag and flash, and your entire window disappears and you see the desktop for a second before getting the new Workspace. In Cubase, it is instant, and in the scenario described above, it almost seemed like my narrow mixer view was part of the main window, and sliding out. I’m going to be using Workspaces in Cubase all the time now… where I avoided them in Logic.
To Investigate: I’m thinking you could make a Macro
1.) Opens Workspace with narrow channel view
2.) ‘Show Channels Connect to First Selected Channel’
Problem is, in the Macro, how to activate the white box around the narrow mix console window so it receives ‘Show Channels Connect to First Selected Channel’
All points except 2 and 8 are solid, and you haven’t even tried to import, preview and export video (which doesn’t even allow you to choose the resolution). Number 7 (key commands) is actually a preview of greater problems. An unwritten rule in Cubase is that if you use something that is not default, it is likely to contain bugs. Actually, when you write support, one of the first things that they recommend you when you experience problems is to trash your user preferences. It is so likely that you have to do that in every version upgrade that most of us don’t have any in the first place.
I confirm that feeling and I have been using Cubase since version 7.5. The problem is that the other DAW’s aren’t that great either, and Logic is not an option for those who like to route MIDI or PC owners.
I hope that Steinberg listens to this kind of comments.
That’s a good idea. I get it and that is what I have done.
But as i mentioned when i’m used to a fast workflow in LPX a change of DAW isn’t supposed to slow me down. It’s supposed to enhance my experience and that is what i thought Cubase would do for me. So far it has not. Even after 3 weeks of working in the daw and googling every little detail as it came about.
A DAW is an instrument to me and i’m very sensitive to all the small quirks, as I would be playing the piano or a guitar. I’ve also worked intensively in Ableton and Studio One, but neither of them meet my requirements in film. I was my hope that Cubase would be the solution, but when i cant save my tailored instruments, delete an object in 1 click, make simple automation adjustments or rely on simple key commands to work as i zoom in or out something is just basically wrong and I return to LPX in order to meet my deadlines.
I hope Steinberg reads this and i want other people who are thinking about changing from LPX to Cubase to be aware of these shortcommings, as they often aren’t mentioned when people talk about Cubase being the ultimate DAW for filmcomposers.
I’m going to continue trying it out but for now it won’t be my primary choice.
I’ve never had a problem with Key Commands not working, unless you’re talking about Macros?
This isn’t making sense to me? Just select the Event and press your Delete key? Why would you have to select the eraser tool? Alternatively you could create a macro: “Select Events Under Cursor, Delete”
Regarding item 4.)
I assume you need to save instrument tracks together with FX Send Tracks in a package? That seems to be missing in Cubase. If you work only with Inserts saving the track as a Track Preset should be the way to go. Any such track can be drag’n’dropped with one click from the right zone “Media” later.

